Check Engine Light
Engine Oil Pressure Sensor

Many car users do not usually think of engine oil pressure until there is an issue with it. What, though, is an oil pressure sensor? Oil is an essential tool for lubricating engines, reducing friction, and ensuring their effective functioning. Engine oil pressure helps distribute it effectively throughout the engine. Insufficient oil pressure can cause serious engine damage. Oil pressure sensors plays a vital role in protecting your engine. This article explores the role of oil pressure sensors in the accurate measurement and control of oil pressure.
What is an Engine oil Pressure Sensor?
An engine oil pressure sensor is designed to measure and control oil pressure, making it a critical component in engines. It is made to ensure that oil is properly distributed in the engine, to reduce friction and also prevent engine wear. This pressure provides better movement and reduces friction between components, preventing damage. This sensor sends the measured oil pressure data to the engine control unit and illuminates the dashboard warning light if the pressure is not up to standard. You can find this sensor, either near your car’s oil filter or on the engine block. The sensor’s purpose is to provide real-time information and signal any problems instantly.
How Does an Engine Oil Pressure Sensor Work?
Oil pressure sensors are crucial to machineries, especially, heavy machinery such as excavators, oil pressure sensors, as they detect low pressure and prevent engine overheating in machines.
There are two mechanisms, depending on the device, namely:
- The resistive type oil pressure sensor, and,
- The switch type oil pressure sensor.
Let’s now consider what they both mean and what they do.
1. Resistive Type Oil Pressure Sensor
Resistive types of oil pressure sensors use the following principles.
They have a viable resistor (rheostat) that monitors and controls the resistance changes based on the oil pressure.
When the oil pressure decreases or increases, it moves a diaphragm or pressure-sensitive component inside the sensor. This changes the resistance, and this change in resistance is converted to an electrical signal that indicates the pressure level.
2. Switch Type Oil Pressure Sensor
This is a type of oil pressure sensor is simple with the capability of switching systems on and off. This simple mechanism is cost-effective and reliable for basic monitoring. A switch-type sensor has a pressure-sensitive diaphragm. It opens or closes an internal electrical circuit depending on pressure changes. If the oil pressure is low, the switch closes the circuit.
Also read: https://app.kamsiparts.com/what-is-oil-pressure-sensor-switch/
Components of an Oil Pressure Sensor
The oil pressure sensor has several integral components. The list is provided below. The housing is the outer shield that protects and encloses the internal components. The pressure diaphragm is a flexible membrane that responds to changes in oil pressure.
Types of Oil Pressure Sensors
An oil pressure sensor is often useful for various devices. Different types help in its operation and use. Let’s look at some examples.
1. Analog Oil Pressure Sensors
Analog sensors provide a consistent and varied range of readings for pressure gauges. You may find them in older systems due to their redundancy in advanced devices and tools.
Typical uses are in older vehicles or high-performance applications where accurate pressure readings are required.
2. Digital Oil Pressure Sensors
Digital oil pressure sensors are available. They have an improved on/off signal system and offer advanced features.
3. Integrated Sensors
As the name implies, these sensors are designed for integrated systems. For example, they combine pressure detection with temperature or other parameters. Two simultaneous sensing capabilities can help evaluate the system and respond more quickly.
These sensors are ideal for smart engines with advanced control systems.
Importance of The Engine Oil Pressure Sensor
Oil pressure sensors are crucial components of a system. They can help with the following functions:
1.Engine Protection
Without proper oil pressure, engine components can wear out. Due to high friction, overheating and damage to parts can occur. Pressure sensors predict potential failures and prevent them with proper maintenance. Therefore, they are used effectively in pressure sensor systems.
2. System Monitoring
Is there a fault in your system? A pressure sensor provides instant updates and helps increase reliability. It can address problems in their early stages and prevent long-term damage and replacements. Therefore, pressure sensors are worthwhile tools.
3.Fuel Efficiency
Engine performance depends on the functionality and friction of its components. Low friction leads to better performance and efficiency. Proper pressure results in optimal fuel efficiency. However, fuel efficiency decreases with pressure changes. Pressure sensors already highlight the problem and help you optimize the system and fuel efficiency.
4.Safety Mechanism
Some machines stop working when the pressure drops below a certain threshold. Thanks to pressure sensors that detect problems, damage to the machine’s engine can be prevented.
Causes of Engine Oil Pressure Fail
- Electrical Issues: Wrong wire connnections.
- Contamination and oil sludge.
- Poor maintenance culture.
- Engine over-heating.
- Wear and tear of engine components.
- Oil leaks from engine parts.
- Accumulation of debris and dirts.
- Carbon deposits.
Applications of Engine Oil Pressure Sensors
Oil pressure sensors offer a wide range of applications. These can include:
- Heavy machinery (excavators, tractors)
- Marine engines
- Piston engines for aircraft
- Industrial generators
In these machines, the operating mechanism is the same, except for the fluid or oil levels and their monitoring.
Symptom Possible Causes & Solutions
PROBLEM: Oil pressure warning light stays on
- Low oil level or degraded oil
- Faulty oil pressure sensor
- Wiring problem
- Check and top up oil
SOLUTION:
- Test and replace sensor
- Inspect wiring/connectors
- Oil pressure warning light flashes
PROBLEM: Loose or corroded wiring
- Intermittent sensor failure
- Oil pump problem
SOLUTION:
- Secure and clean connections
- Replace faulty sensor
- Inspect oil pump
- Gauge reads zero or very low pressure
PROBLEM: Faulty sensor or gauge
- Measure pressure with a mechanical gauge
- Replace oil filter
- Replace sensor/gauge
PROBLEMS: Oil pressure gauge shows a very high value, or a Faulty sensor sending false readings
- Test and replace sensor
- Check oil pressure relief valve
- Engine is noisy (Knocking).
PROBLEM: Low oil pressure
- Check the oil level and condition
- Check the pressure with a manual pressure gauge
- Resolve internal engine problems.
Other signs include, unusual engine noises.
How to Diagnose a Faulty Oil Pressure Sensor
Before fixing sensor problems, it is important you confirm the problem. To do this:
- Do Visual Inspection
Visual inspection includes, checking oil leaks all around the sensor.
- Use a Trusted Mechanic
If you cannot diagnose the issue, use a trusted mechanic.
- Get an OBD-II Scanner
This scanner reads error codes on sensor, and properly diagnose the issue.
How to Fix Oil Pressure Sensors Issues
You will need these tools to fix your sensors:
- A socket set
- A new oil pressure sensor, if you are replacing.
- A thread sealant.
Step-by Step on How to Fix The Sensor
- Put off the engine and allow engine to cool.
- Find the sensor.
- Disconnect the old sensor.
- Connect a new sensor.
- Connect the wires.
- Restart the engine.
How to Prevent Your Oil Sensor Failing
The cost of maintenance is way cheaper than fixing or replacing the oil sensor. Hence, the following reveals practical tips in maintaining the oil sensor:
- Change engine oil regularly.
- Use quality engine oil grade.
- Fix sensor problems like leaks early.
- Replace oil filter to prevent debris storage.
- Do not ignore check engine light warnings.
- Allow only trusted mechanics to inspect and work on your car.
The recommended time interval of checking the oil pressure sensor is one month.
Cost of Replacing a Bad Oil Sensor
- For a new sensor the cost is between $25-$100
- Labour cost is between $60-$150
- Total cost is $80-$300
Note: This cost depends on your type of car and location. For example, standard cars cost lesser than luxurious cars. The sensor type is also affects the cost as electronic sensors cost much more than mechanical ones.
FREQUENTLY ASKED QUESTION
- Can bad engine oil pressure sensor cause engine damage?
No, bad oil pressure sensor cannot directly cause damage.
- Can I drive safely with a bad oil pressure sensor?
It is not recommended to drive with a bad sensor.
- Is advisable to replace a bad sensor myself?
Yes, with the right tools and materials, you can replace it yourself.
- How long does an engine oil pressure last?
Typically, it lasts, up to 44-10 years, depending on a number of factors.
- What’s the cost of replacing a bad engine oil pressure sensor?
The cost is about $80-$300, depending on a number of factors.
Conclusion
Oil pressure is quite an essential tool for the proper functioning of engines and devices. Accurate oil pressure measurements are crucial to avoid any problems. To achieve this, you should purchase high-quality oil pressure sensors. Where can you get them? Going for the best pressure sensors ensures accurate measurements and reliable engine protection. Consult trusted suppliers for sensors that meet your system’s needs. Some preventive maintenance tips for your sensor include, changing your oil regularly, fix any leaks you notice on time and check your oil level regularly. The cost of replacing a bad engine oil pressure is around $80 – $300. Do not ignore check engine light warning. If warning persist, consult a trusted mechanic.
Read also: Knock Sensor: All You Need To Know


Owning a car comes with lots of responsibilities. Part of owning a car is dealing with a lot of problems, from small to big breakdowns, both electrical and mechanical. You are most likely to experience more minor breakdowns due to faulty electrical components. Among the components that occasionally fail is the starter motor, which turns the engine during ignition. However, signs such as squealing or whining noise, or the presence of dashboard lights but no engine power, indicate a problem with the starter motor. Fortunately, checking a starter motor isn’t too complicated, and troubleshooting this type of problem can be a DIY job. Let’s consider the right procedure for checking your starter motor.
HOW THE STARTER MOTOR WORKS
Before we get into how to test a car jump starter, let’s understand how it works.
A starter motor draws power from the battery used and uses the engine’s flywheel to start the process of combustion. Starter motors are found in modern cars and replace the old manual method of starting engines with a hand crank. This makes starting the engine safer and more efficient. This car component uses a solenoid for sending power to the motor, a motor, and a pinion gear for engaging the engine with flywheel.
SIGNS OF A BAD STARTER MOTOR
If you notice the following warning signs, then your starter motor may be bad.
- A grinding noise.
- Burning or smoke smell.
- Dashboard lights may come on but the engine doesn’t crank.
- You hear a clicking sound when you try to put on the engine.
WAYS FOR TESTING THE STARTERS MOTOR
Although the starter motor is still a small component; it can be tested in several ways, not just one. After all, it doesn’t work on its own; it still needs a battery and other components to function correctly. This means the problem could be with the starter motor itself or with other parts.
The following are different ways to check your car’s starting system.
1.CHECK FOR SIGNS OF A STUCK PINION GEAR
The pinion gear of a starter motor is responsible for moving the crankshaft by engaging with the flywheel and turning it, and disengaging once the engine is running. As a moving part, the pinion gear can seize and stop working.
Here’s what you need to do to see if the pinion gear is causing a problem.
- Do a Visual Inspection
To test the starter motor without removing it, you will need to visually inspect for signs of a stuck pinion gear. When the headlights dim when you try to start the engine, it is a sign that the pinion gear is stuck on the flywheel.
You will also hear the sound of an engine trying to start, along with dimmed lights, when the pinion ear is faulty. However, if there’s a clicking sound without the noise of an engine trying to start, and the lights also dim, the problem is likely the battery. In this case, you should check the electrical components directly.
- Release The Stuck Pinion
Once you are sure the pinion gear is stuck, do not use the starter motor until you’ve freed it. Locate the square tab on the back of the starter cylinder and turn it to release the jam. If there is no such bathtub and you have a manual transmission, turn off the ignition, put it in second gear, release the handbrake, and rock the car back and forth until the pinion gear dislodges. If it has an automatic transmission, it is best to remove the starter motor and test it on a test bench.
-
CHECK IF THERE ARE ANY PROBLEMS WITH THE ELECTRICAL SYSTEM
In a car, there is what is called the “electrical trifecta”, made up of the battery, the alternator, and the starter motor. Each one complements the others in a mechanical and electrical cycle. The battery powers the starter motor, which turns the engine, and the alternator turns to recharge the battery.
When one of these components fails, it will likely affect the other components as well. Follow the steps below to check for electrical problems with the starter motor.
- Inspect the Battery for Loose Connections and Voltage
A simple visual inspection can easily identify faulty electrical connections. Try inspecting under the hood for loose wires or corrosion that might be restricting electrical flow. Clean the battery terminals and reconnect and disconnected wires. For more accurate inspection, check the voltage of the battery, if it shows signs of a problem.
- Examine the Solenoid
When there is no problem with the battery but your car won’t start, it’s likely a faulty solenoid. A starter solenoid is an electromagnet attached to the engine that’s prone to poor connections.
Once you’ve resolved any disconnections to the solenoid but the problem persists, you should perform a circuit test on this device. A test light won’t illuminate if there’s still a connection problem, but if it does, there is a problem with the solenoid or the starter motor itself. Depending on the result of your diagnosis, you can proceed with self-repair or take the component for professional work or parts replacement.
-
TEST YOUR STARTER
What is a bench test? First, bench tests should depend on your level of confidence in your abilities. If you are not that confident, you can leave the bench tests to the professionals.
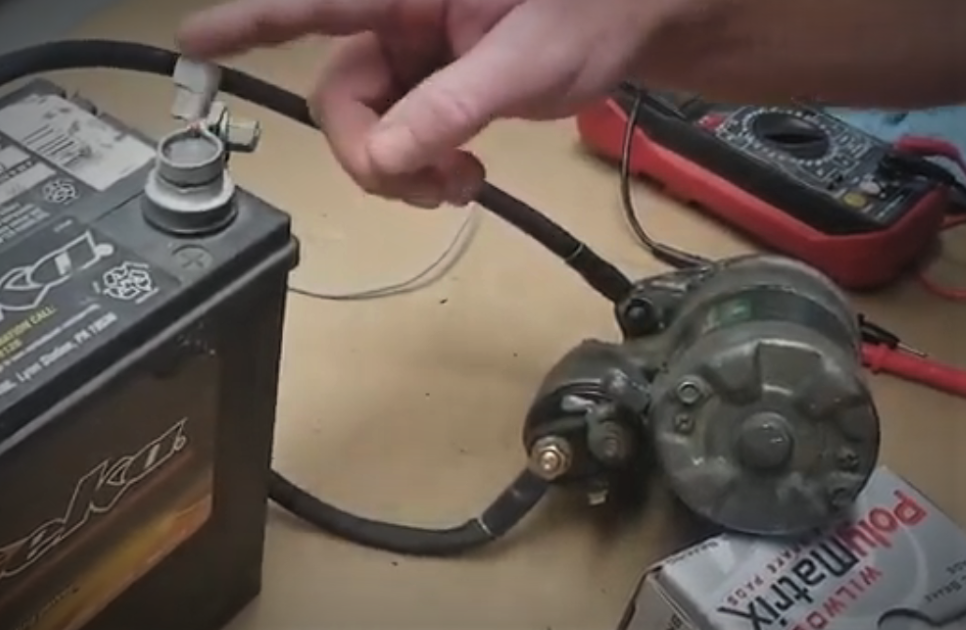
Bench testing is a method for validating whether there are any problems with the starter motor. It involves removing or unbolting the motor from under the hood. Here are proper procedures for bench testing a starter motor.
- Remove the Starter Motor
How do you test a starter motor on a test bench?
– Start with disassembly.
– Disconnect all the starter motor wires.
– Unbolt the motor from the engine block.
– Be sure to label all the wires so you can reconnect them correctly during reassembly.
– Consulting your owner’s manual will also be helpful to avoid getting lost during the process.
- Connect the Jumper Cables
The next step is to connect jumper cables to the starter motor. Find a red jumper cable, connect one end to the positive terminal of the battery and the other to the solenoid. Then, connect a black jumper cable to the negative terminal of the battery, while the other end is hooked into the starter motor’s lug on the main cylinder.
Tools for Testing a Starter Motor
– A multimeter
– Jumper cables
– A set of wrench and screwdrivers.
– A fully charged battery.
– Gloves and goggles for safety.
COMMON CAUSES OF FAILURE
Now that you know how to check if the starter motor is faulty, you may also be interested in characterizing the common causes of failure. Like a car battery, typically replaced every three to five years, a starter motor also has an expected lifespan of 100,000 to 150,000 miles. However, these components don’t fail solely due to wear and tear.
Here are some other reasons why a starter motor might suddenly fail.
1.EXPOSURE TO THE ELEMENTS
All car parts are expected to function properly under ideal conditions. Exposure to elements such as water and dirt could lead to corrosion and premature deterioration of metal parts. Water can short-circuit electrical components and remove protective lubrication, while dirt can cause corrosion and rust.
2. EXPOSURE TO EXTREME CONDITIONS.
Automotive components are expected to function under specific conditions and pressures. However, constant exposure to extreme heat or cold can cause starter motor and battery components to wear out much faster. It is important to follow regular and safe driving conditions to avoid excessively exposing the vulnerabilities of its components.
3. INCORRECT AND BAD INSTALLATION OF STARTER MOTOR
Regular maintenance is essential to extend the lifespan of a part or the whole of a car. This maintenance includes the correct installation of critical components such as electrical devices. Any misplacement or misalignment in simple connections can cause failure in the component.
TIPS FOR EXTENDING STARTER MOTOR LIFESPAN
TIP 1: Do not do repeated short starts
Tip 2: Ensure that your battery is in good condition.
Tip 3: Do regular car maintenance.
Tip 4: If you notice any car problem, fix it on time.
COST FOR REPLACING A STARTER
If you have a bad starter, you have the option of repairing it or replacing it. If you wish to replace it, here is what it will cost you.
– The cost of replacing parts of starters: $75 -$350
– Cost of labour: $150-$220
– A total estimate: $200-$220.
Note: This cost varies, depending on the model of car and your location.
FREQUENTLY ASKED QUESTION
- How long does a starter motor last?
A starter motor lasts between 120,000 to 150,000 miles.
- Will my car start with a bad starter?
This depends on the type of car. For automatic cars, it cannot start, but for manual cars, you may push it to start.
- What will it cost to fix a starter motor?
It cost between $200- $550.
Conclusion
The starter motor is a simple component of your car. It plays an important role in whether your car starts or not. Knowing how to test a starter motor demonstrates critical knowledge and skill should you encounter ignition problems. It is essential to learn how to check your car’s starter to diagnose any related problems that may arise. But most importantly, make sure you maintain your car to prevent these kinds of problems in the first place. Although checking starters can be an easy DIY task, it does not hurt to take extra precautions. When unsure, consult a trusted mechanic.
Read also:Throttle Position Sensor Symptoms
Have you ever pressed your accelerator but your car wouldn’t just respond the way it is expected to? That situation can be disturbing. The throttle position sensor is an important component in your car engine. This component monitors how open the throttle valve is depending on how much pressure is applied on the accelerator pedal. It controls how much air flows into the intake manifold, found in the engine. The engine control module, transmits how fast the throttle positions closes and open. The accelerator pedal sensor transmits the position of the accelerator pedal to the engine control unit (ECU). This information allows the ECU to determine the amount of acceleration the driver applies. When this sensor does not act as it should, it can affect the performance of car and even its fuel economy. This page explains the operating principle of modern accelerator pedal sensors and the symptoms that indicate a sensor malfunction. You will also learn how to have accelerator pedal sensors checked in a workshop.
AN OVERVIEW OF THE THROTTLE POSITION SENSOR
The throttle position sensor is an essential component that informs the ECU about the precise opening of the throttle plate, allowing for accurate adjustment of the air-fuel mixture. In modern drive-by-wire systems, this sensor becomes even more critical, ensuring agile response and optimal fuel metering from the very first millisecond.
From its beginnings as an external and easily replaceable device, the throttle position sensor has evolved into designs integrated into the electronic throttle body, eliminating additional moving parts. This transition, driven since the 2000s by manufacturers such as Toyota and BMW, aims to improve the reliability and signal synchronization of next-generation injection systems.
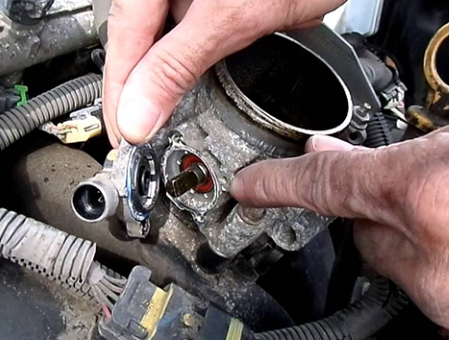
You can find the throttle position sensor, mounted in the body of the throttle. It sends data to the ECU to adjust integral things like the fuel injection, ignition timing and air intake. Your car performs well, when this sensor is good.
Operating Principle of the Throttle Position Sensor
Accelerator Pedal Sensor: Operation
In modern vehicles, the proportion of electronic components is constantly increasing. This is due, among other reasons, to legal regulations, e.g., those related to reducing fuel consumption and emissions. Electronic components are also being used more and more to improve active and passive safety, as well as driving comfort. Among these components, the accelerator pedal sensor is a notable example.
For use in automobiles, contactless sensors, which operate on an inductive principle, are becoming increasingly common. This sensor consists of a stator, which includes an excitation coil, receiving coils, and evaluation electronics, and a rotor, formed by one or more closed loops with a specific geometry.
Applying an alternating voltage to the transmitting coil generates a magnetic field that induces a voltage in the receiving coils. The electronics process and evaluate these amplitudes, which are then sent as a direct current voltage to the control unit. The control unit evaluates the signal and transmits the corresponding pulse, e.g., to the throttle valve regulator. The properties of the voltage signal depend on the accelerator pedal position.
The Most Common Symptoms of Throttle Position Sensor
1. The Check Engine Light is One
This is the most common symptoms of a bad Throttle Sensor. It may indicate these common error codes; P0120, P0122 and P0121. Whenever you see any of these codes, you should know that there is an issue with the readings of your throttle sensor.
2.Slow Response to Acceleration
A slow response to acceleration is an indication that your car’s throttle position sensor is bad. In this instance, you will notice; weak acceleration, or even difficulty in overtaking another car.
In the event of a bad accelerator pedal sensor, some of the following symptoms may also appear:
- The engine only shows an increase in idle speed.
- The vehicle does not respond to accelerator pedal movements.
- The vehicle goes into “limp mode.”
- The check engine light illuminates.
3.Struggling to Change Gears
Gears are important in any car, be it manual or automatic. The Throttle Position sensor helps to control shifts in gears. But this is difficult in a bad sensor. If your sensor is bad, you will experience, delay in changing gears and transmission issues.
4. Low Fuel Economy
A bad position sensor can cause low fuel economy. In this case you may notice; reduced fuel mileage and bad engine performance.
5. Jerking While in Motion
If you notice sudden jerks while driving and a random change in acceleration, then you need to check your throttle position sensor.
Why the Throttle Position Sensor Fails
A malfunction can be caused by one of the following:
- Damaged connections or wiring at the accelerator pedal sensor.
- Lack of power and ground connection
Faulty evaluation electronics in the sensor
Build-up of dirts and carbon.
Using poor quality sensors for replacement.
Troubleshooting
- Accelerator Pedal Sensor Inspection
During troubleshooting, the following steps should be considered:
Read fault codes
- Visually inspect the accelerator pedal sensor for mechanical damage
- Visually inspect all relevant electrical connections and wiring to ensure they are secure and undamaged
- Test the sensor using an oscilloscope and a multimeter
Using a Mercedes-Benz A-Class (150) 1.7 as an example, the following describes all the troubleshooting steps, technical data, and illustrations to explain the fault location process.
Diagnose a Bad Throttle Position Sensor, how?
The following are confirmed ways for diagnosing a bad throttle position sensor:
- Use a Multmeter
This multimeter is used for measuring voltage changes when the throttle is in motion.
- Carry out a Visual Inspection
Visually inspect the sensor. Look out for bad or disconnected wires.
- Use an OBD-II Scanner
Use an OBD-II Scanner to check for any error codes relating to the throttle position sensor.
Step-By-Step Methods of Fixing a Bad Throttle Position Sensor
- First, clean dirts and carbon buildup on the sensor.
- Next, use a quality brand of throttle body cleaner to do a thorough clean up on it.
Sometimes, simply cleaning the position sensor may be all it needs to function properly again. But if the symptoms persist even after cleaning, consider replacing the sensor.
How to Replace a Bad Throttle Position Sensor
- First, carefully disconnect the battery.
- Second, remove the bad sensor.
- Third, gently replace the new sensor
- Finally, if necessary, calibrate the new sensor.
The Cost of Replacing a Throttle Position Sensor
The cost of replacing a throttle position sensor, depends on a number of factors, like the quality of sensor you want to use, the location and the labor cost. However, here is a typical estimated cost:
- Cost of sensor parts around, $25 -$200
- Cost of labour is about $65 -$150.
If you wish to do the replacement yourself, then, you will also need to include the cost of tools to use. You will need tools like a socket set and a screw driver.
Practical Maintenance Tips the Throttle Position Sensor
Maintenance always saves you money and time. Follow these practical tips to maintain your position sensor:
- Regularly clean the body parts of your throttle.
- Check the connections and wires.
- Only use good quality sensors when your throttle sensor is due for replacement.
- Do a periodic test to see how your throttle position sensor is doing. You may need a multimeter or an OBD-II scanner.
Frequently Asked Questions
1. Will I see error codes if my Throttle position sensor is bad?
Yes, you will. Error codes like P0121 and P0123 may be evident.
2. What happens if my position sensor is bad?
Poor fuel economy, sudden jerks while moving, and slow response to acceleration are common happening you would experience if your sensor is bad.
3. How do I clean my throttle sensor?
For thorough cleaning, use a good brand of throttle body cleaner.
4. Is replacing a bad position sensor easy?
Yes, with the right tools, you can easily do it.
5. How much does it cost to replace a bad throttle position sensor?
Around $150 -$250 for the sensor parts and labour cost.
6. What commonly causes a throttle position sensor to fail?
Accumulation of dirt, carbon build-up and faulty connections are a few things that can cause it to fail.
7.Can I replace a bad throttle position sensor myself?
Yes, you can easily replace it yourself, if you have the right tools.
Read also: Engine Oil Pressure Sensor
Conclusion
Conclusively, at a simple glance, the throttle position sensor may appear as a small and insignificant component of the engine. But, as you have seen from this article, it plays a significant role in making sure that your car is safe for use and its engine performs well. Some common symptoms of bad throttle position sensor include, slow response to acceleration, poor fuel economy and sudden jerks or surge while the car is in motion. Thankfully, both fixing and replacing a bad throttle position sensor is not so expensive. To fix a bad position sensor, you can simply clean the sensor or check the wiring for any disconnections. To replace a bad position sensor, first, remove your battery, disconnect wires and replace the throttle sensor with a new one. If you are already noticing any of the symptoms discussed in this article, do not wait till it get worse. Consult a trusted mechanic.
Also read:https://www.ctscorp.com/Products/Position-Sensors/Throttle-Position-Sensors
A tiny but essential part of the engine management system in your car is the camshaft position sensor. It is essential for keeping an eye on the camshaft’s position and speed, which enables the engine control unit (ECU) to precisely regulate fuel injection and ignition timing. Even well-maintained engines can experience major performance issues when this sensor starts to malfunction, therefore replacing the camshaft position sensor is a crucial repair that should never be disregarded.
Electronic sensors play a major role in the efficient operation of modern cars. Together with the crankshaft position sensor, the camshaft position sensor makes sure the engine’s valves open and close at the appropriate times.
The ECU can have trouble deciding when to inject fuel or turn on the spark plugs without precise input from this sensor. Hard starting, engine misfires, poor acceleration, and in extreme situations, total engine failure, are some of the symptoms that may result from this.
Until the check engine light shows or the car completely stops starting, many drivers are ignorant of the warning indicators. Unfortunately, driving with a malfunctioning camshaft position sensor can result in higher emissions, more fuel consumption, and possibly even damage to other engine parts. You may save time, money, and needless stress by knowing how this sensor functions and when it needs to be replaced.
Everything you need to know about replacing a camshaft position sensor is covered in this thorough guide, including typical failure symptoms, diagnostic trouble codes, replacement pricing, sensor location, and a step-by-step replacement procedure. This article will help you make wise choices and maintain the smooth and effective operation of your engine, whether you’re a do-it-yourself automobile owner or just want to understand what your mechanic is doing.

What Is a Camshaft Position Sensor?
An electronic device called a camshaft position sensor keeps track of the precise location and speed at which the camshaft rotates inside an engine. The engine control unit (ECU) of the car receives this data and uses it to regulate vital engine operations like valve functioning, ignition timing, and fuel injection timing. The engine cannot operate effectively or consistently without precise information from the camshaft position sensor.
Usually, the sensor detects a magnetic field or signal produced by a rotating camshaft gear or reluctor wheel. Each time the camshaft completes a given movement, the sensor transmits a signal to the ECU, allowing the system to know which cylinder is on its compression or power stroke.
This flawless synchronization guarantees that spark plugs ignite precisely when needed and gasoline is injected at the appropriate time.
Modern cars typically use two primary types of camshaft position sensors: Hall-effect sensors and magnetic (inductive) sensors.
Hall-effect sensors employ a digital signal that yields more precise and reliable readings than magnetic sensors, which produce an electrical signal based on variations in magnetic fields. Hall-effect sensors are used in the majority of modern cars because of their accuracy and dependability.
The camshaft position sensor is typically installed physically close to the timing cover, camshaft, or cylinder head. Depending on the engine design—inline, V-type, or overhead cam engines, for example—its location may change.
Camshaft position sensor replacement is a regular and essential repair during a vehicle’s lifetime since the sensor is subjected to harsh operating circumstances due to its proximity to high heat and moving engine elements, which can eventually cause wear or failure.
A solid basis for identifying failure symptoms and determining when replacement is necessary to maintain maximum engine performance is provided by an understanding of what a camshaft position sensor is and how it works.
Read also:Variable Valve Timing Solenoid – Symptoms, Location, Function & Replacement Cost
What Does a Camshaft Position Sensor Do?
The engine control unit (ECU) receives information from the camshaft position sensor, which tracks the precise location and rotational speed of the camshaft. The ECU uses this information to precisely regulate fuel injection and ignition timing, ensuring that every cylinder fires at the right time for efficient combustion and smooth engine operation.
By assisting the ECU in modifying valve operation in response to driving circumstances, the sensor also assists systems like variable valve timing (VVT) in contemporary automobiles.
Engine timing becomes erroneous when the camshaft position sensor malfunctions, resulting in subpar performance, misfires, higher fuel consumption, and the requirement for prompt camshaft position sensor replacement.
Signs You Need a Camshaft Position Sensor Replacement
You can prevent expensive engine damage and unexpected failures by identifying the early warning indicators of a faulty camshaft position sensor. The most prevalent symptoms are described in detail below, with SEO-friendly subheadings for improved readability and search exposure.
Check Engine Light Turns On
The check engine light is one of the most common signs of a malfunctioning camshaft position sensor. The engine control unit (ECU) recognizes and records a fault code when the sensor transmits erroneous or inconsistent signals. The lit warning light indicates that a replacement camshaft position sensor may soon be required, even if the car may still be operational.
Engine Cranks but Fails to Start
The engine may not start at all due to a malfunctioning camshaft position sensor. Since the ECU depends on the sensor to identify proper ignition and fuel injection timing, faulty data can stop the engine from firing. The engine may frequently crank normally but not start, particularly if the sensor fails entirely.
Rough Idling and Engine Stalling
Engine timing becomes unsteady when the camshaft position sensor malfunctions. This frequently leads to erratic engine stalling, uneven RPMs, or rough idling, especially at low speeds or when stopping at traffic lights. If the sensor is not changed right away, these symptoms may get worse with time.
Poor Acceleration and Reduced Engine Performance
Slow acceleration or a discernible decrease of power are additional typical indicators. Poor combustion timing brought on by inaccurate camshaft position data reduces the engine’s responsiveness during acceleration. When accelerating, drivers may hesitate or jerk, which indicates that the camshaft position sensor needs to be replaced.
Decreased Fuel Efficiency
Fuel efficiency may be adversely affected by a malfunctioning camshaft position sensor. The engine uses more gasoline than is required to generate the same amount of power when fuel injection timing is off. This eventually results in higher fuel usage and operating expenses.
Transmission Shifting Problems
Gear shifting may be impacted by a malfunctioning camshaft position sensor in certain cars, particularly those with automatic transmissions. The transmission may have trouble shifting ratios smoothly, shift forcefully, or shift late. This happens as a result of the ECU coordinating engine and transmission operation using camshaft data.
Common Camshaft Position Sensor Error Codes
An OBD-II scanner can read the diagnostic trouble code (DTC) that the engine control unit (ECU) typically saves when a camshaft position sensor starts to malfunction.
These codes assist in determining whether the sensor, its wiring, or associated engine timing issues are the source of the problem. Knowing these codes can help you determine when it’s time to repair the camshaft position sensor.
P0340 – Camshaft Position Sensor Circuit Malfunction
A general malfunction in the camshaft position sensor circuit is indicated by this code. A malfunctioning sensor, broken wiring, or a bad electrical connection could be the cause. The engine may still function, but starting issues may arise and performance is frequently diminished.
P0341 – Camshaft Position Sensor Range/Performance Problem
When the sensor signal is outside of the anticipated range, code P0341 is displayed. This typically indicates erroneous camshaft position readings, which might interfere with fuel timing and ignite. The problem is often fixed by swapping out the camshaft position sensor.
P0342 – Camshaft Position Sensor Circuit Low Input
This error code indicates that the signal being received by the ECU is too weak. A malfunctioning sensor, shorted wiring, or contamination from oil leaks are typical causes. Ignoring this code may cause the engine to stall or misfire.
P0343 – Camshaft Position Sensor Circuit High Input
An unusually high signal voltage from the camshaft position sensor is indicated by P0343. This is frequently brought on by electrical issues like broken wire or a faulty sensor, necessitating the replacement of the camshaft position sensor.
P0365 – Camshaft Position Sensor “B” Circuit Malfunction
This number is applicable to engines that have several camshaft sensors. It indicates a problem with the secondary camshaft sensor circuit, which may have an impact on the engine’s overall performance and variable valve timing.
Although a camshaft position sensor issue is strongly suggested by these error codes, sensor failure is not always confirmed by them. Similar codes may result from timing chain issues, wiring problems, or ECU defects. Accurate camshaft position sensor replacement is ensured by proper diagnosis, which also avoids needless repairs.
What Causes Camshaft Position Sensor Failure?
Although camshaft position sensors are made to last for many years, they can eventually fail due to the extreme engine conditions in which they function. You can minimize premature damage and determine when camshaft position sensor replacement is necessary by being aware of the common causes of failure.
Heat and Engine Vibration
Usually installed close to the engine’s cylinder head, the camshaft position sensor is subjected to intense heat and continuous vibration. Inaccurate readings may result from vibration that damages the sensor’s internal circuitry or loosens connections, while heat can eventually deteriorate internal electronic components.
Oil Contamination and Leaks
The sensor housing or electrical connector may become contaminated by oil leaks from camshaft seals or valve covers. Oil contamination of the sensor disrupts signal transmission and may result in sporadic malfunctions. In order to restore correct engine timing, oil-soaked sensors frequently need to be replaced right away.
Electrical and Wiring Issues
Communication between the sensor and the ECU may be hampered by loose electrical plugs, rusted connectors, or damaged wiring. Sometimes electrical problems simulate sensor failure even when the sensor itself is still operational. Replacing the camshaft position sensor might not be enough to completely fix the problem if there is significant wiring damage.
Age and Normal Wear
Camshaft position sensors deteriorate with time, just like the majority of electrical parts. Internal wear eventually results from constant exposure to heat, moisture, and mechanical stress. Sensor failure in older or high-mileage cars frequently results from normal aging rather than a particular flaw.
Low-Quality Replacement Parts
Early failure may result from using inexpensive or subpar aftermarket sensors. These sensors might not fulfill OEM requirements, which could lead to erroneous readings or a brief service life. Selecting an OEM or high-quality sensor lowers the chance of needing to replace the camshaft position sensor again.
Can You Drive with a Bad Camshaft Position Sensor?
Although it is not advised, driving with a malfunctioning camshaft position sensor is occasionally possible. The engine control unit (ECU) may enter a default or “limp” mode when the sensor begins to malfunction, allowing the car to operate with less efficiency.
Short-distance driving may be made possible by this, but fuel delivery and engine timing are no longer optimum.
Short-term symptoms could include higher fuel consumption, poor acceleration, and rough idling. Unexpected worsening of these problems can result in abrupt engine stalling or a no-start situation. This could be risky, particularly if the engine stalls while you’re in traffic.
Driving for extended periods of time with a malfunctioning camshaft position sensor can put more stress on the engine and associated parts. Misfires, increased emissions, and possible catalytic converter damage can result from improper timing.
The safest and most economical way to prevent more mechanical problems and unplanned malfunctions is to replace the camshaft position sensor as soon as possible.
Camshaft Position Sensor Replacement Cost
Although replacing a camshaft position sensor is often a reasonably priced repair, the final cost may vary based on the make and model of the car as well as whether you decide to do it yourself or hire a professional. Budgeting and choosing the best course of action are made easier when you comprehend the cost breakdown.
Average Cost Breakdown
Replacing a camshaft position sensor typically costs between $120 and $350. Depending on engine accessibility and local labor rates, labor charges can range from $70 to $200, while the sensor itself usually costs between $50 and $150. Because they require more labor, some expensive cars or engines with hard-to-reach sensors may cost extra.
Cost by Vehicle Type
-
Economy Cars: Usually the cheapest to repair, with total costs between $120–$200.
-
SUVs and Trucks: Can range from $180–$300 due to more complex engine layouts.
-
Luxury or Performance Vehicles: May exceed $350 if parts are expensive or labor is intensive.
Dealership vs Independent Mechanic
Although they use OEM sensors and ensure correct installation, dealerships frequently charge more for both parts and labor. Independent mechanics can minimize total expenses without sacrificing dependability by using high-quality aftermarket sensors and typically offering lower labor rates.
DIY vs Professional Replacement
Many automobiles may be replaced on your own if you have the necessary tools and a basic understanding of mechanics. Usually, DIY expenses just cover the sensor ($50–$150). Labor-intensive engines, however, might still need expert assistance to prevent errors that could cause more harm.
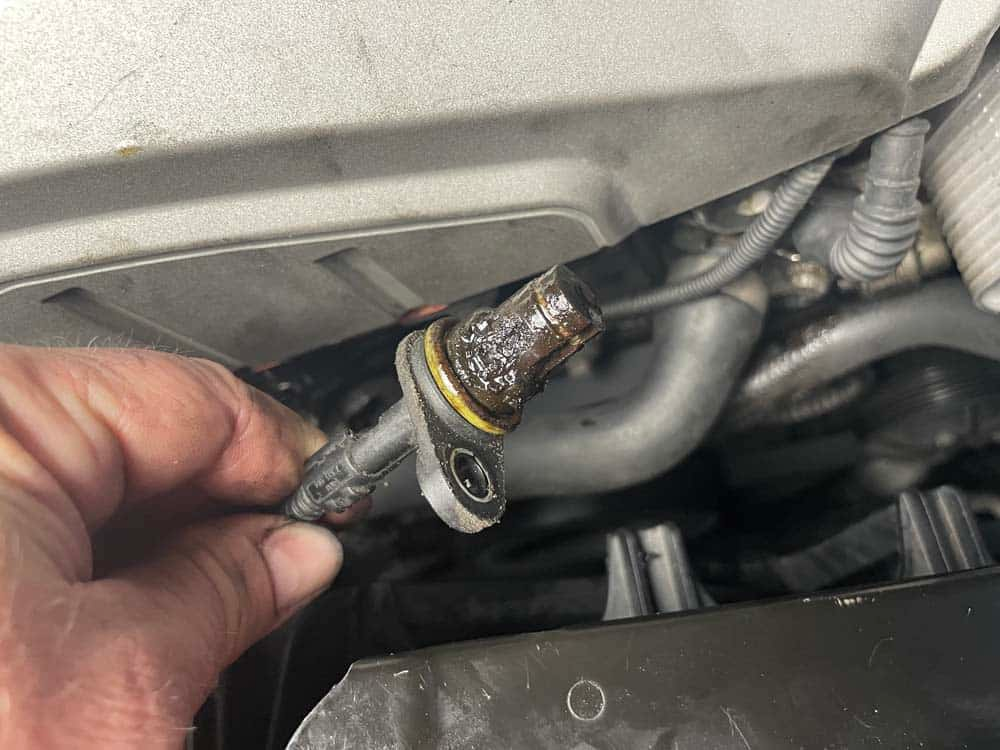
Camshaft Position Sensor Location
For diagnosis and replacement, it is essential to know where your camshaft position sensor is located. The majority of sensors are carefully positioned close to the camshaft to precisely monitor its rotation, while the precise location varies based on the engine type and manufacturer.
How to Diagnose a Bad Camshaft Position Sensor
Before choosing to repair a failed camshaft position sensor, it is crucial to accurately diagnose it because similar symptoms might be brought on by wiring difficulties or other engine faults. Here’s how to find out if the sensor is malfunctioning.
Using an OBD-II Scanner
The most dependable instrument for identifying problems with camshaft sensors is an OBD-II scanner. Sensor-related problems like P0340, P0341, or P0342 can be found by checking the engine’s stored issue codes. Additionally, the scanner can offer real-time data to demonstrate whether the sensor is consistently transmitting signals to the ECU.
Visual Inspection
Check for obvious damage to the sensor and its wiring. Look for corroded pins, loose couplings, or contaminated oil. Any physical damage could mean that the sensor needs to be replaced right away.
Multimeter Testing
Use a multimeter to check the resistance or voltage output of the sensor for a more accurate diagnosis. Check the readings against the specifications provided by the manufacturer. If the signal is erratic or nonexistent, the sensor is probably defective and needs to be replaced.
How to Replace a Camshaft Position Sensor (Step-by-Step Guide)
For do-it-yourselfers with a basic understanding of mechanics, replacing a camshaft position sensor is a doable procedure. Following the right procedures guarantees flawless installation, prevents damage, and effectively recovers engine performance.
Tools and Materials Needed
Before starting, gather the following:
-
New camshaft position sensor (OEM or high-quality aftermarket)
-
Socket set and ratchet
-
Screwdrivers
-
Torque wrench (if required)
-
Clean cloth or rag
-
Safety gloves
Safety Precautions Before Starting
To avoid electrical shocks or short circuits, always unplug the battery before working on the engine. To prevent burns, work in an area with good ventilation and make sure the engine is cool.
Step 1: Disconnect the Battery
To stop the ECU and sensor circuits from receiving power, disconnect the negative battery connector. By doing this, unintentional electrical shorts during the replacement procedure are avoided.
Step 2: Locate the Camshaft Position Sensor
To locate the sensor, consult the handbook that came with your car. Usually, it is close to the camshaft, timing cover, or cylinder head. To improve access, adjacent components may need to be cleared.
Step 3: Remove the Electrical Connector
Press the release tab and carefully pull the connector to detach the sensor’s wiring harness. To avoid damaging the wires, do not tug on them directly.
Step 4: Remove the Sensor Bolt
The mounting bolt or bolts holding the sensor in place can be removed using the proper socket or wrench. Since the bolts are necessary for installation, keep them secure.
Step 5: Remove the Old Sensor
The old sensor should be carefully removed from its housing. To avoid damaging other components, gently jiggle it if it’s stuck because of grease or dirt.
Step 6: Install the New Sensor
Make sure the new sensor is completely seated before inserting it into the mounting hole. To prevent misalignment, which could impact engine timing readings, align it correctly.
Step 7: Reconnect the Battery
Reattach the battery’s negative terminal. The ECU and sensor circuits are once again powered.
Step 8: Clear Error Codes and Test Drive
To remove any stored issue codes, use an OBD-II scanner. To verify smooth idling, appropriate acceleration, and the absence of the check engine light, start the engine and take a test drive.
Common Mistakes to Avoid During Camshaft Position Sensor Replacement
Although it may appear simple to replace a camshaft position sensor, several errors might result in subpar performance or even engine damage. A seamless and effective replacement of the camshaft position sensor can be ensured by being aware of these hazards.
Installing the Wrong Sensor
Using a sensor that isn’t suitable with your car is one of the most frequent errors. Engine misfires, check engine lights, and transmission problems can result from even little variations in sensor type, connector design, or signal output. Before making a purchase, always confirm the part number and specs.
Not Clearing Engine Codes
If diagnostic trouble codes (DTCs) are not cleared after installing a new sensor, the check engine light may remain on and the ECU may not be able to adjust the engine timing. To reset codes after replacement, always use an OBD-II scanner.
Ignoring Wiring Issues
Sometimes the issue is not a malfunctioning sensor; corroded connectors or broken wiring can simulate a malfunctioning sensor. Repetitive issues could result from installing a new sensor without first checking the wiring.
Over-Tightening Mounting Bolts
The sensor housing may shatter or the mounting threads may be harmed if the mounting bolts are overtightened. To correctly secure the sensor, always adhere to the torque specifications provided by the manufacturer.
Failing to Lubricate O-Rings
O-rings are included with some camshaft position sensors to provide a tight seal. Oil leaks or damage to the O-ring may result from installing the sensor dry. To guarantee a good seal, lightly lubricate the O-ring with engine oil before to installation.
How Long Does a Camshaft Position Sensor Last?
The type of vehicle, driving circumstances, and maintenance practices all affect how long a camshaft position sensor lasts. These sensors typically last between 70,000 and 100,000 miles, however some may break down sooner because of environmental conditions or engine problems.
Best Camshaft Position Sensor Brands
Maintaining engine performance and preventing recurrent failures depend on selecting a trustworthy camshaft position sensor. Although there are numerous options available, choosing premium or OEM (Original Equipment Manufacturer) sensors guarantees precision, robustness, and compatibility with your car.
OEM Sensors
OEM sensors are built to exact specifications by the car manufacturer or authorized suppliers. They are the most dependable, fit flawlessly, and typically include a warranty. OEM camshaft position sensor replacement ensures correct engine timing and long-term performance, despite the fact that they are frequently more costly.
Aftermarket Sensor Brands
Several reputable aftermarket brands produce high-quality camshaft position sensors, often at a lower cost than OEM parts. Popular options include:
-
Delphi: Known for durability and accurate signal output.
-
Denso: Offers sensors with precise calibration and long service life.
-
Bosch: High reliability and widely used across many vehicle models.
-
Standard Motor Products (SMP): Affordable and meets or exceeds OEM standards.
When selecting an aftermarket sensor, always check compatibility with your vehicle’s make, model, and engine type to ensure correct operation.
FAQs About Camshaft Position Sensor Replacement
How Long Does Camshaft Position Sensor Replacement Take?
For most cars, changing a camshaft position sensor takes between thirty and sixty minutes. The position of the sensor and engine accessibility determine how long it takes. Vehicles with sensors hidden beneath intake manifolds or other parts might need more disassembly, which would lengthen the time it takes to replace them.
Can a Bad Camshaft Sensor Damage the Engine?
Yes, inadequate ignition timing and fuel injection mistakes brought on by a malfunctioning camshaft position sensor can result in engine misfires, rough running, elevated emissions, and in rare instances, catalytic converter failure. Replacing the engine as soon as possible can stop additional damage.
Will a Bad Camshaft Sensor Cause Misfires?
Of course. Engine misfires can be directly caused by inaccurate camshaft position data, which can lead to inadequate fuel and spark timing. This frequently results in decreased engine performance, hesitancy during acceleration, and harsh idling.
Do I Need to Reprogram the ECU After Replacement?
When a replacement camshaft position sensor is inserted and the error codes are cleared, the ECU in the majority of cars automatically recalibrates. However, if variable valve timing is involved, some contemporary cars would need to undergo ECU reset or relearning operations.
Can Oil Leaks Affect the Camshaft Position Sensor?
Yes, intermittent or permanent sensor failure may result from contamination of the sensor and its connector by oil leaks from valve covers or camshaft seals. Maintaining a clean engine environment contributes to longer sensor life.
When to See a Mechanic for Camshaft Position Sensor Replacement
While skilled do-it-yourselfers can replace some camshaft position sensors, there are specific circumstances that call for expert assistance. Seeing a mechanic guarantees that the work is completed accurately, safely, and to avoid possible engine damage.
Complex Engine Layouts
The camshaft position sensor can be found in narrow engine bays, next to timing chains, or behind intake manifolds in many contemporary cars. In certain situations, it might be difficult to access and replace the sensor without the proper equipment and expertise, so hiring a professional is a safer option.
Persistent Error Codes
There can be wiring problems, ECU malfunctions, or other engine issues if the check engine light stays on after the sensor is replaced or if several diagnostic trouble codes continue to appear. To find and address the underlying cause, a mechanic can do comprehensive diagnostics.
Engine Performance Concerns
Severe symptoms like abrupt power outages, misfires, or persistent stalls point to more than a straightforward sensor malfunction. Mechanics are able to test the engine in real-world scenarios, confirm sensor operation, and guarantee appropriate timing modifications.
Warranty and Quality Assurance
A guarantee on parts and labor is frequently included when a professional replaces the camshaft position sensor. Compared to do-it-yourself projects with inferior parts, this guarantees piece of mind and lowers the possibility of recurrent failures.
Conclusion
A tiny but essential part that guarantees correct engine timing, fuel injection, and ignition performance is the camshaft position sensor. Costly damage can be avoided by identifying warning indications, such as rough idling, poor acceleration, or check engine lights, and comprehending frequent causes.
Engine performance is restored, fuel efficiency is increased, and dependable operation is guaranteed with timely camshaft position sensor replacement utilizing high-quality components and correct installation. Resolving sensor problems as soon as possible is essential to maintaining the smooth operation of your car, whether you decide to do it yourself or hire a professional repair.
-

 Car Problems5 months ago
Crankshaft Pulley: Symptoms of Failure, Replacement Cost & Function
-

 DIY Fixes5 months ago
Engine Mount Replacement Cost
-

 Car Problems5 months ago
Cylinder Head Temperature Sensor: Function, Symptoms & Replacement Cost
-

 Car Problems5 months ago
How Much Is a Turbo Charger?
-

 Car Problems5 months ago
Variable Valve Timing Solenoid – Symptoms, Location, Function & Replacement Cost
-

 Check Engine Light5 months ago
Camshaft Position Sensor Replacement
-

 Costs5 months ago
Catalytic Converter Replacement Cost
-

 Car Problems5 months ago
Best Catalytic Converter Cleaner