Engine Diagnostics
Knock Sensor: All You Need To Know
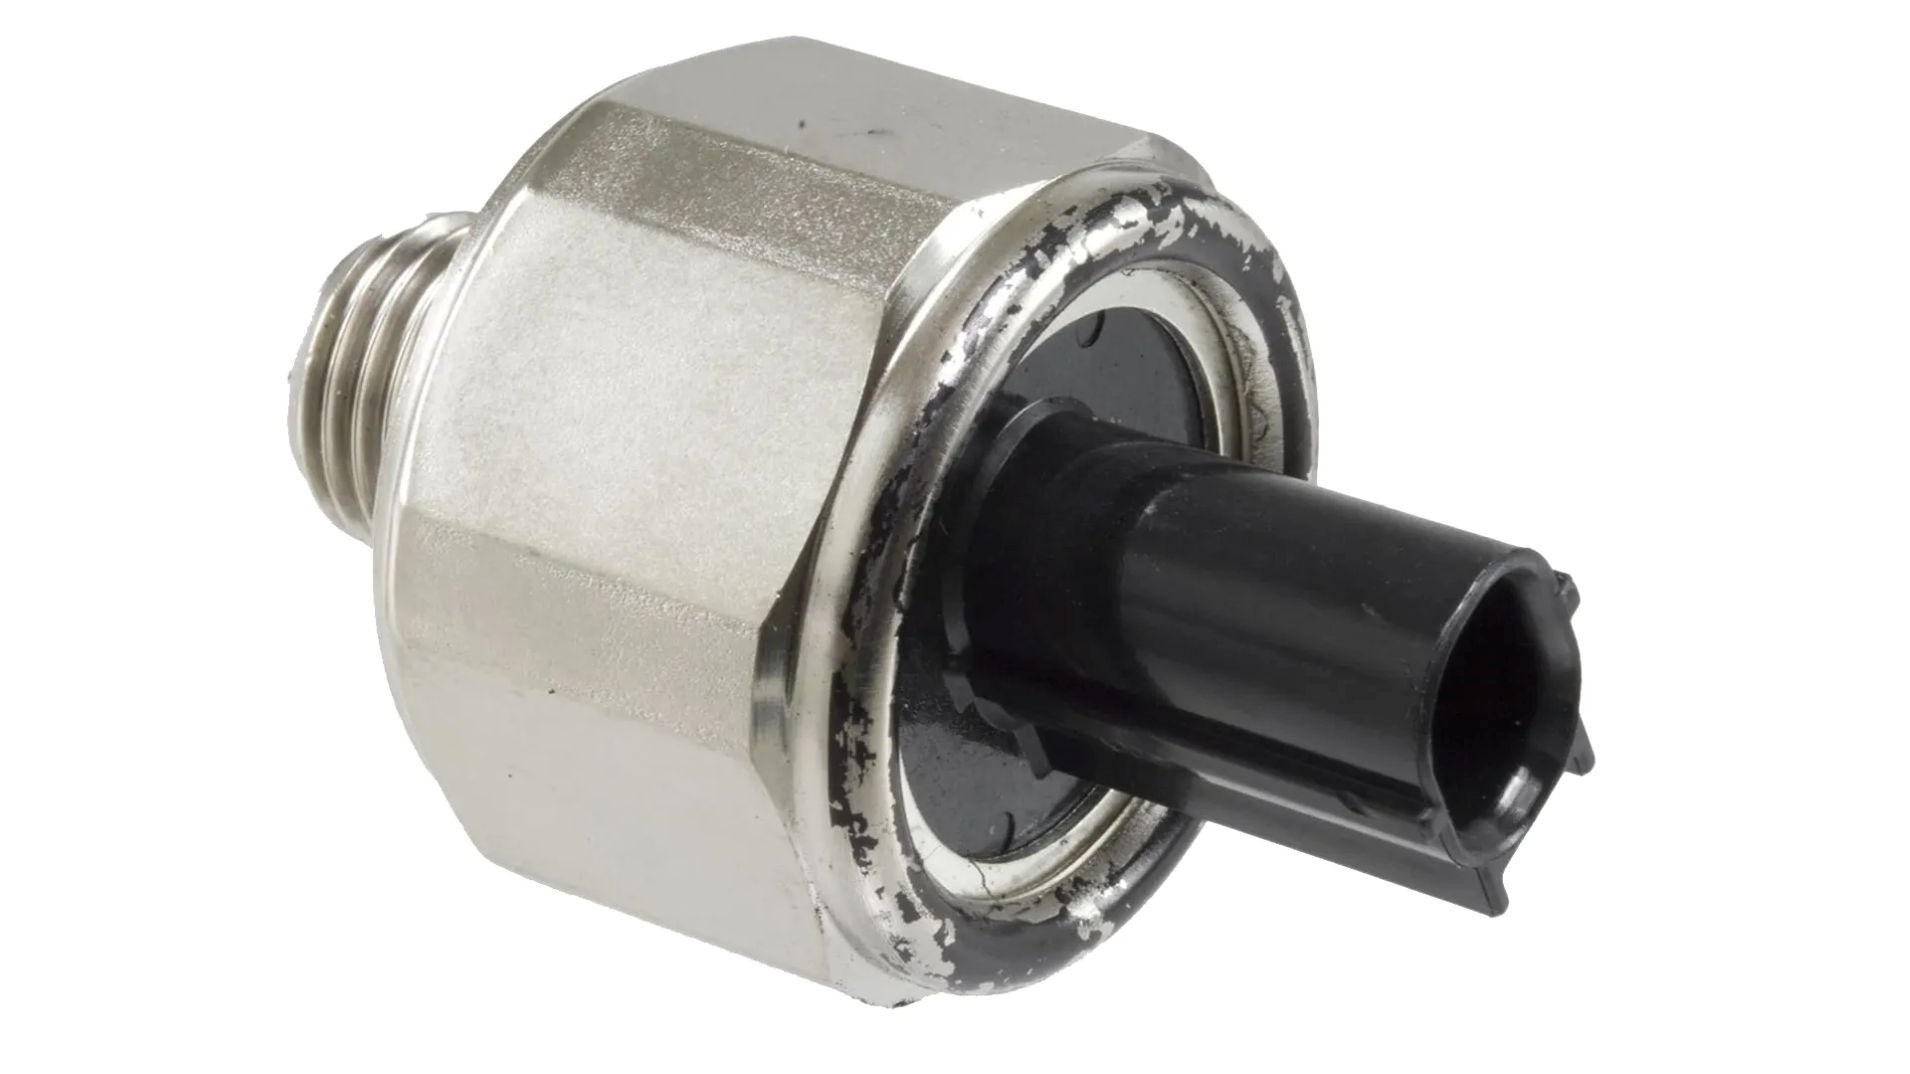
Located on the outside of the engine block, the Knock sensor, is a piezoelectric sensor that produces voltage through mechanical stress. A knock sensor is used to identify high-frequency engine vibrations. A knock sensor is crucial in modern engines, as it works to prevent damage in the engine that is caused by combustion. It also functions as a sensor converter that converts vibration into electrical signals. When a knock sensor goes bad, it results in diminished power, vanished fuel mileage, and poor fuel efficiency. This article covers, all about; how a knock sensor works, why they are important, causes of knock sensor failure and how to replace a knock sensor.
AN OVERVIEW OF A KNOCK SENSOR
Knock sensors are internal components used in internal combustion engines that convert vibration to electrical signals. You can find it on the engine block or cylinder head.
Functions of the Sensor
Basically, it’s a mechanical vibration sensor. The knock sensor’s function is to transform the engine’s mechanical vibrations into electrical oscillations that can be interpreted by the engine control unit (ECU). The analysis, through complex mathematical calculations, allows the ECU to detect the presence of knocking. The ECU can identify and separate knocking from other sources of mechanical vibrations present in the engine. The information is sent as a variable voltage signal, the value of which depends on the intensity of the detected mechanical vibration.
Let’s break down these functions:
- Knock sensors serve as engine protectors. For example, they detect signs of engine knock before it happens.
- They offer help to ensure fuel economy.
- They also help in the reduction of emission.
- These sensors also prevent engine damage
Application of knock Sensor
Knock sensors, installed on the engine block, detect all vibrations originating from mechanical components. Knock is one of these vibrations. The engine control unit (ECU) isolates the vibrations resulting from knocks from others, such as: connecting rod play, piston pin, valves, tappets, etc.
The application of knock sensors to modern mapped ignition systems allows for maximum power output while simultaneously protecting the engine from potential damage caused by knock.
- Detonation
Defined as a rapid increase in cylinder pressure during combustion, detonation is a form of uncontrolled combustion that causes a loss of efficiency and can result in the destruction of mechanical components (when uncontrolled). The detonation phenomenon generally occurs with high manifold pressures (engine under load) and excessive ignition advance.
- Operating Principle
The knock sensor can be of the piezoelectric type (the most common).
- Piezoresistive Knock Sensor
In this type, a semiconductor membrane is subjected to deformations caused by the presence of knock in the cylinders.These deformations modify the resistivity characteristics (resistance) of the semiconductor. This change in the material’s resistance can be measured at the sensor’s electrical terminals and indicates the presence of knock (or some other noise that has reached the sensor).In both cases, therefore, the electrical signal generated by the sensor must be processed by the engine control unit (ECU) to separate the variations caused by knock from those originating from other engine components (valves, tappets, etc.). A very important consideration is that the tightening torque for the bolt that secures the sensor to the engine block, as specified by the manufacturer, must be respected. Basically, the information sent by the KS sensor is used to control the ignition timing.
How The Knock Sensor Work
When the engine is on, the knock sensor constantly monitors for any signs of engine knock. Once any sign is detected, the knock sensor sends a signal to the ECM. The ECM in turn, uses the signal received to adjust the timing of the ignition, thereby preventing engine knocks.
The ECM component uses a microprocessor and some algorithms to function. Knock sensors are just one of the several sensors used by the ECM to ensure that the engine is in good condition. It uses other sensors like the Throttle Piston Sensor, Oxygen Sensor, MAF and others.
When Your Sensor Doesn’t Work
- When the fault results in a failure condition “outside the sensor’s operating range” (short circuit or open circuit), a fault code is stored in memory, which can be retrieved using a diagnostic scanner. In this case, the engine control unit (ECU) applies reduced timing advance to prevent engine damage.
- When the fault results in a failure condition “within the sensor’s operating range,” there is generally no-fault code stored. As a result, knocking may occur under high loads, acceleration, or high RPM.
Common Sign Of a Bad Knock Sensor
If a knock sensor is not functioning properly, it may lead to several issues. So, here are some common signs that you have a bad knock sensor:
-
Poor Engine Performance
When your knock sensor is bad, your engine begins to perform poorly, lacking power and acceleration.
-
Low Fuel Efficiency
Bad knock sensors can lead to more fuel consumption.
-
Engine Light Comes On
This is another sign of a bad sensor. You will see the engine light on the symbol on the dashboard of your car, indicating that there is a fault with the engine.
- Having a Hard Time Starting the Engine:
A bad knock sensor can cause hard starting on the engine, in some cases. Difficulty starting the engine is due to the ECM’s inability to adjust the ignition timing correctly.
5. Unusual Knock Noise from Engine:
Knock noise from the engine is also a sign of a bad knock sensor. When you hear this, you should see a mechanic.
Having gone through those common signs, also note that, a bad knock sensor is not the only reason for these signs. Hence, you should get a proper diagnosis from a trusted mechanic.
Causes of Knock Sensor Failure
There are several causes of knock sensor failure. One main cause of the failure is the connectors. Another cause is continuous vibration. But there are more:
- Exposure to Coolant: Exposure to coolant, oil or other contaminants can cause your knock sensor to give wrong results.
- Physical Damage: Physical damage due to car accidents, can render the sensor ineffective.
- Bad Electrical Connections: This is also another factor that can cause failure in your sensor.
- Continuous Exposure to Vibration: This can cause the sensors to wear out.
- Build- Up of Carbon: Carbon build up can cause abnormal combustion, which in turn, damages the sensor.
- Engine Overheating: When the engine is excessively heated up, it causes failure in the knock sensor.
How do you Test a Knock Sensor?
If you suspect that your sensor is bad, how do you test it? For diagnosis, a diagnostic scanner can be used, displaying the “Timing Advance” parameter or similar, when available. With the engine running, tap on the engine block near the sensor (not directly on it) to verify the timing advance. The knock sensor cannot be verified with a voltmeter or ohmmeter.
Well, there are several ways you can do the test. They include:
- By Using an OBD-II Scanner: This type of scan can detect any abnormal sign in no time.
- The Engine Tap Test: Yes, this is another good way of testing your knock sensor. It senses continuous vibration and sends the signal to ECU.
- By Using a Multimeter: A multimeter can help you test your sensor. It measures the voltage output.
7 Step by Step Methods on How to Replace your Knock Sensor

Knock Sensor
The level of difficulty to replace your sensor, depends on how your engine is designed. Here are the 7 steps to follow:
- First, you need to disconnect your battery.
- Second, find it.
- Third, disconnect the electrical connector in the engine.
- Forth, remove the mounting bolt.
- Fifth, install a new one and tighten firmly.
- Sixth, re-fix the electrical connector you earlier removed.
- Seventh, reconnect the battery.
Tools you Need to Replace Your Sensor
To replace your sensor, you would the following tools:
- Screw drivers
- A torque wrench
- A socket set
- An OBD scanner (may not be necessary)
Cost of Replacing a Knock Sensor
The cost of replacing a knock sensor varies, depending on a number of factors, including the model of your car, engine type and cost of labor.
Generally, the cost of replacing your sensor is:
– Around $40-$150 for a new knock sensor.
– $120-$300, for labor.
Total cost: $160-$450.
Read also: Engine Mount Replacement Cost
FREQUENTLY ASKED QUESTIONS
- Can I drive with a bad Sensor?
Yes, but it is highly not recommended.
- Can bad fuel activate the knock sensor?
Yes, it can activate the knock sensor?
- What if my knock sensor fails?
If your knock sensor fails, it can lead to poor engine performance and low fuel economy.
- How long will my knock sensor last?
Your sensor can last up to, 150,00 – 250,000.
- What does a Knock Sensor do?
It uses piezoelectric sensors to produce voltage and detect vibrations caused by engine knocking.
- Where is the knock sensor located?
The sensor is installed on the engine block (3) and is sensitive to mechanical vibrations caused by detonation or the impact of internal mechanical parts. Four-cylinder engines generally have one sensor. Six- and eight-cylinder engines generally have two sensors.
CONCLUSION
Though small, the Knock Sensor is a crucial internal component in modern cars. It detects vibrations that cause engine knocking and thus protects the engine from damage. You can use a multimeter to test if your knock sensor is in good condition.The cost of this sensor is around $160-$450, including labor cost. To keep your sensors working well, regularly maintain it and take your car to a trusted mechanic if you notice something unusual.
Read also: https://www.thedrive.com/cars-101/35148/what-is-a-knock-sensor


Have you ever pressed your accelerator but your car wouldn’t just respond the way it is expected to? That situation can be disturbing. The throttle position sensor is an important component in your car engine. This component monitors how open the throttle valve is depending on how much pressure is applied on the accelerator pedal. It controls how much air flows into the intake manifold, found in the engine. The engine control module, transmits how fast the throttle positions closes and open. The accelerator pedal sensor transmits the position of the accelerator pedal to the engine control unit (ECU). This information allows the ECU to determine the amount of acceleration the driver applies. When this sensor does not act as it should, it can affect the performance of car and even its fuel economy. This page explains the operating principle of modern accelerator pedal sensors and the symptoms that indicate a sensor malfunction. You will also learn how to have accelerator pedal sensors checked in a workshop.
AN OVERVIEW OF THE THROTTLE POSITION SENSOR
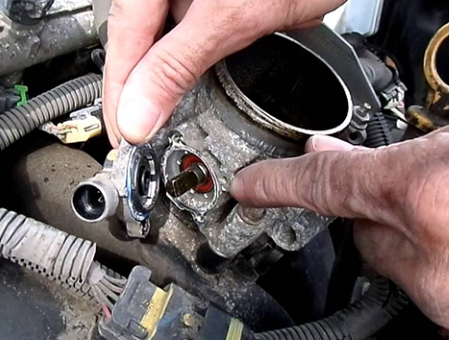
The throttle position sensor is an essential component that informs the ECU about the precise opening of the throttle plate, allowing for accurate adjustment of the air-fuel mixture. In modern drive-by-wire systems, this sensor becomes even more critical, ensuring agile response and optimal fuel metering from the very first millisecond.
From its beginnings as an external and easily replaceable device, the throttle position sensor has evolved into designs integrated into the electronic throttle body, eliminating additional moving parts. This transition, driven since the 2000s by manufacturers such as Toyota and BMW, aims to improve the reliability and signal synchronization of next-generation injection systems.
You can find the throttle position sensor, mounted in the body of the throttle. It sends data to the ECU to adjust integral things like the fuel injection, ignition timing and air intake. Your car performs well, when this sensor is good.
Operating Principle of the Throttle Position Sensor
Accelerator Pedal Sensor: Operation
In modern vehicles, the proportion of electronic components is constantly increasing. This is due, among other reasons, to legal regulations, e.g., those related to reducing fuel consumption and emissions. Electronic components are also being used more and more to improve active and passive safety, as well as driving comfort. Among these components, the accelerator pedal sensor is a notable example.
For use in automobiles, contactless sensors, which operate on an inductive principle, are becoming increasingly common. This sensor consists of a stator, which includes an excitation coil, receiving coils, and evaluation electronics, and a rotor, formed by one or more closed loops with a specific geometry.
Applying an alternating voltage to the transmitting coil generates a magnetic field that induces a voltage in the receiving coils. The electronics process and evaluate these amplitudes, which are then sent as a direct current voltage to the control unit. The control unit evaluates the signal and transmits the corresponding pulse, e.g., to the throttle valve regulator. The properties of the voltage signal depend on the accelerator pedal position.
The Most Common Symptoms of Throttle Position Sensor
1. The Check Engine Light is One
This is the most common symptoms of a bad Throttle Sensor. It may indicate these common error codes; P0120, P0122 and P0121. Whenever you see any of these codes, you should know that there is an issue with the readings of your throttle sensor.
2.Slow Response to Acceleration
A slow response to acceleration is an indication that your car’s throttle position sensor is bad. In this instance, you will notice; weak acceleration, or even difficulty in overtaking another car.
In the event of a bad accelerator pedal sensor, some of the following symptoms may also appear:
- The engine only shows an increase in idle speed.
- The vehicle does not respond to accelerator pedal movements.
- The vehicle goes into “limp mode.”
- The check engine light illuminates.
3.Struggling to Change Gears
Gears are important in any car, be it manual or automatic. The Throttle Position sensor helps to control shifts in gears. But this is difficult in a bad sensor. If your sensor is bad, you will experience, delay in changing gears and transmission issues.
4. Low Fuel Economy
A bad position sensor can cause low fuel economy. In this case you may notice; reduced fuel mileage and bad engine performance.
5. Jerking While in Motion
If you notice sudden jerks while driving and a random change in acceleration, then you need to check your throttle position sensor.
Why the Throttle Position Sensor Fails
A malfunction can be caused by one of the following:
- Damaged connections or wiring at the accelerator pedal sensor.
- Lack of power and ground connection
Faulty evaluation electronics in the sensor
Build-up of dirts and carbon.
Using poor quality sensors for replacement.
Troubleshooting
- Accelerator Pedal Sensor Inspection
During troubleshooting, the following steps should be considered:
Read fault codes
- Visually inspect the accelerator pedal sensor for mechanical damage
- Visually inspect all relevant electrical connections and wiring to ensure they are secure and undamaged
- Test the sensor using an oscilloscope and a multimeter
Using a Mercedes-Benz A-Class (150) 1.7 as an example, the following describes all the troubleshooting steps, technical data, and illustrations to explain the fault location process.
Diagnose a Bad Throttle Position Sensor, how?
The following are confirmed ways for diagnosing a bad throttle position sensor:
- Use a Multmeter
This multimeter is used for measuring voltage changes when the throttle is in motion.
- Carry out a Visual Inspection
Visually inspect the sensor. Look out for bad or disconnected wires.
- Use an OBD-II Scanner
Use an OBD-II Scanner to check for any error codes relating to the throttle position sensor.
Step-By-Step Methods of Fixing a Bad Throttle Position Sensor
- First, clean dirts and carbon buildup on the sensor.
- Next, use a quality brand of throttle body cleaner to do a thorough clean up on it.
Sometimes, simply cleaning the position sensor may be all it needs to function properly again. But if the symptoms persist even after cleaning, consider replacing the sensor.
How to Replace a Bad Throttle Position Sensor
- First, carefully disconnect the battery.
- Second, remove the bad sensor.
- Third, gently replace the new sensor
- Finally, if necessary, calibrate the new sensor.
The Cost of Replacing a Throttle Position Sensor
The cost of replacing a throttle position sensor, depends on a number of factors, like the quality of sensor you want to use, the location and the labor cost. However, here is a typical estimated cost:
- Cost of sensor parts around, $25 -$200
- Cost of labour is about $65 -$150.
If you wish to do the replacement yourself, then, you will also need to include the cost of tools to use. You will need tools like a socket set and a screw driver.
Practical Maintenance Tips the Throttle Position Sensor
Maintenance always saves you money and time. Follow these practical tips to maintain your position sensor:
- Regularly clean the body parts of your throttle.
- Check the connections and wires.
- Only use good quality sensors when your throttle sensor is due for replacement.
- Do a periodic test to see how your throttle position sensor is doing. You may need a multimeter or an OBD-II scanner.
Frequently Asked Questions
1. Will I see error codes if my Throttle position sensor is bad?
Yes, you will. Error codes like P0121 and P0123 may be evident.
2. What happens if my position sensor is bad?
Poor fuel economy, sudden jerks while moving, and slow response to acceleration are common happening you would experience if your sensor is bad.
3. How do I clean my throttle sensor?
For thorough cleaning, use a good brand of throttle body cleaner.
4. Is replacing a bad position sensor easy?
Yes, with the right tools, you can easily do it.
5. How much does it cost to replace a bad throttle position sensor?
Around $150 -$250 for the sensor parts and labour cost.
6. What commonly causes a throttle position sensor to fail?
Accumulation of dirt, carbon build-up and faulty connections are a few things that can cause it to fail.
7.Can I replace a bad throttle position sensor myself?
Yes, you can easily replace it yourself, if you have the right tools.
Read also: Engine Oil Pressure Sensor
Conclusion
Conclusively, at a simple glance, the throttle position sensor may appear as a small and insignificant component of the engine. But, as you have seen from this article, it plays a significant role in making sure that your car is safe for use and its engine performs well. Some common symptoms of bad throttle position sensor include, slow response to acceleration, poor fuel economy and sudden jerks or surge while the car is in motion. Thankfully, both fixing and replacing a bad throttle position sensor is not so expensive. To fix a bad position sensor, you can simply clean the sensor or check the wiring for any disconnections. To replace a bad position sensor, first, remove your battery, disconnect wires and replace the throttle sensor with a new one. If you are already noticing any of the symptoms discussed in this article, do not wait till it get worse. Consult a trusted mechanic.
Also read:https://www.ctscorp.com/Products/Position-Sensors/Throttle-Position-Sensors
One of the most crucial pieces of a car’s exhaust system is the catalytic converter, but replacing it may be costly. When it breaks down, a lot of automobile owners are taken aback by the expensive repair costs and frequently question if a replacement is really necessary. Because of this ambiguity, drivers seeking precise, trustworthy information before to contacting a repair frequently search for information on catalytic converter replacement costs.
Depending on the kind of vehicle, brand, and whether an original equipment manufacturer (OEM) or aftermarket part is chosen, the average cost of replacing a catalytic converter can range from several hundred to several thousand dollars.
The amount you will ultimately pay is also heavily influenced by factors including labor prices, pollution standards, and even an increase in catalytic converter theft. These factors can result in significantly differing replacement costs for two cars with comparable engine sizes.
This guide will teach you the precise factors that influence the cost of replacing a catalytic converter, how to spot early warning signals of failure, and doable techniques to save costs. This article will assist you in making well-informed, economical decisions while adhering to emissions regulations, whether you’re dealing with a malfunctioning converter, a stolen one, or just preparing ahead.

What Is a Catalytic Converter and What Does It Do?
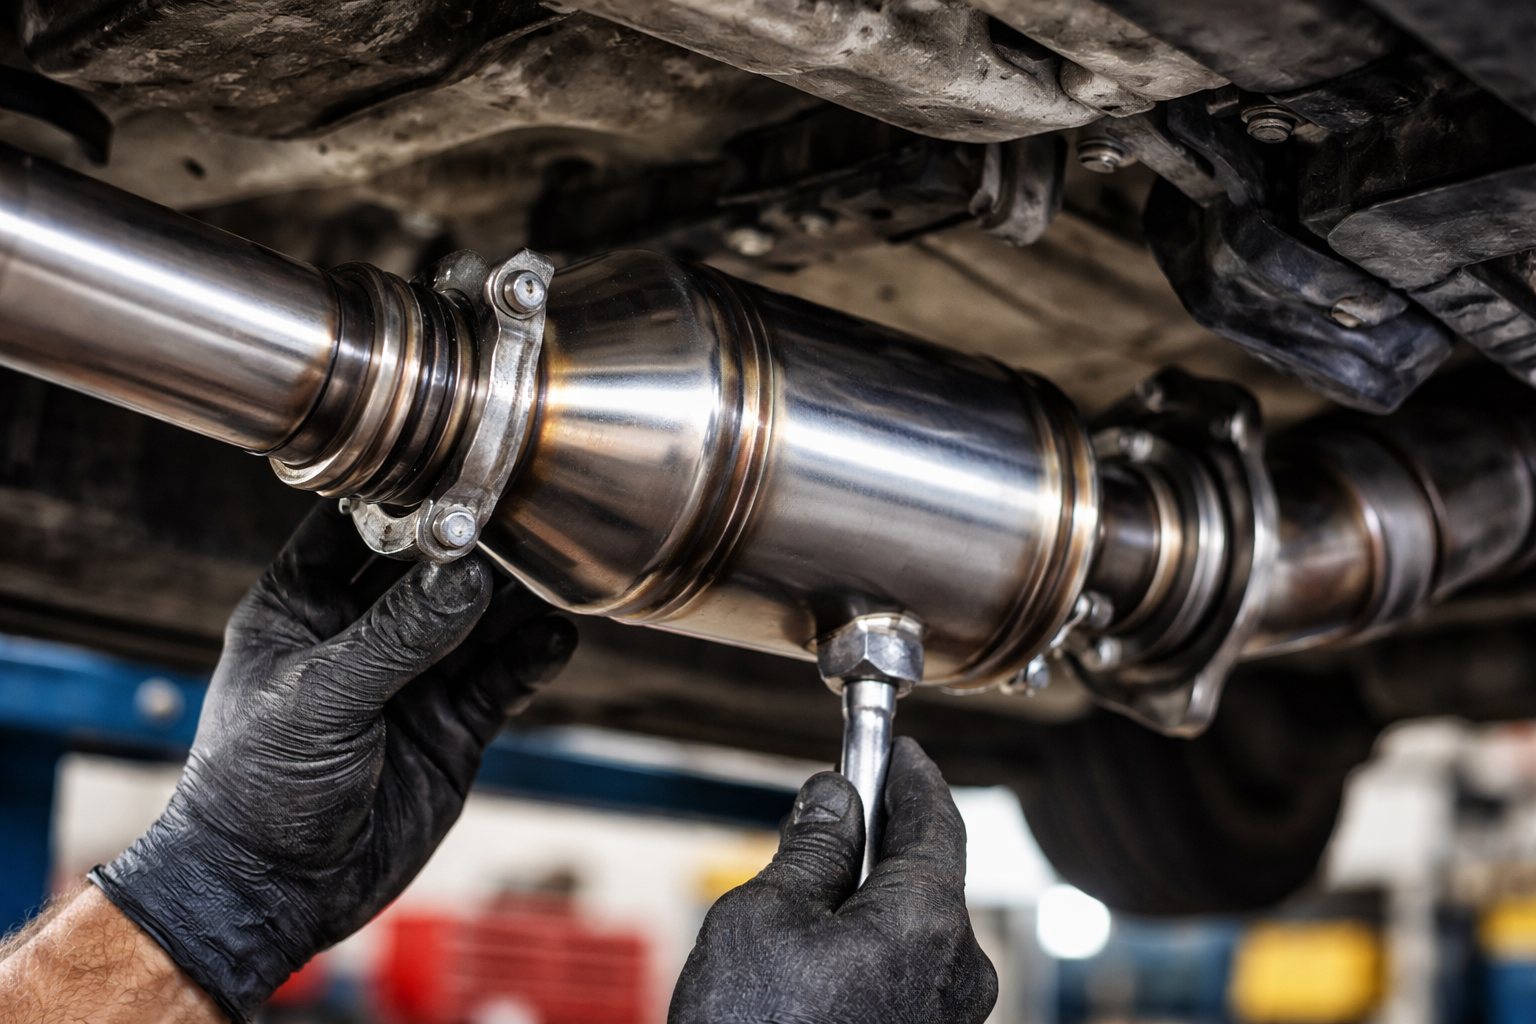
A crucial emissions-control component found in a car’s exhaust system, typically situated between the engine and the muffler, is a catalytic converter. Its main purpose is to transform dangerous gases into less poisonous forms before they leave the tailpipe, hence lowering the quantity of gases emitted into the atmosphere.
The catalytic converter is mandated by law on the majority of contemporary cars due to its significance in the environment.
A honeycomb-shaped structure covered with precious metals including rhodium, palladium, and platinum is found inside the catalytic converter.
Chemical reactions occur when hot exhaust gases flow over this structure, converting hazardous pollutants like carbon monoxide, nitrogen oxides, and unburned hydrocarbons into safer gases like carbon dioxide, nitrogen, and water vapor. This procedure aids cars in fulfilling pollution regulations set by the government.
A well-functioning catalytic converter enhances engine efficiency in addition to safeguarding the environment. Exhaust flow is hindered when it gets blocked or damaged, which can result in lower engine performance, poor fuel efficiency, and higher emissions.
It is simpler to understand why replacement costs are frequently high and why ignoring early issues might result in even more costly repairs later on when one is aware of how the catalytic converter operates.
Read also: Camshaft Position Sensor Replacement
Catalytic Converter Replacement Cost
Although it can occasionally be even more expensive, the typical replacement cost of a catalytic converter is between $900 and $2,500. While replacement costs for luxury cars, SUVs, trucks, and hybrids can easily surpass $3,000, they can be as low as $300 to $800 for economy cars with simpler exhaust systems. One of the main reasons this repair is seen as costly is the large price range, which frequently surprises car owners.
The catalytic converter itself accounts for the majority of the expense. Depending on the manufacturer, model, and if you select an OEM or aftermarket machine, parts alone often cost between $400 and $2,000. Because OEM catalytic converters are made especially for your car and adhere to stringent emissions regulations, they are far more costly. Although aftermarket converters are less expensive, they might not be as long-lasting or legal everywhere.
Usually, labor expenses raise the whole cost by $100 to $500. The converter’s accessibility, whether it is bolted or welded in place, and local mechanic rates all affect the ultimate labor cost. Although this part provides a brief response, the real cost of replacing a catalytic converter relies on a number of variables, which are covered in more detail in the sections that follow.
Average Catalytic Converter Replacement Cost by Vehicle Type
Depending on the kind of car you drive, replacing a catalytic converter might be quite expensive. The final cost is influenced by variations in engine size, exhaust system complexity, pollution regulations, and converter design. This is a summary of what you can usually anticipate paying according to the type of vehicle.
Sedans and Compact Cars
Catalytic converter replacement expenses are typically lowest for sedans and small automobiles. Their exhaust systems are typically simpler to access, and their smaller engines necessitate less costly converters. Sedans and small cars typically cost between $300 and $1,500 to replace, including labor and parts. Particularly when aftermarket converters are available, popular vehicles from companies like Toyota, Honda, Nissan, and Hyundai frequently fall on the lower end of this range.
SUVs and Crossovers
Due to their larger engines and more intricate exhaust systems, SUVs and crossovers typically cost more to repair. To comply with emissions regulations, many SUVs employ larger or numerous catalytic converters. The average replacement cost is between $1,000 and $2,500, with labor expenses significantly higher because of the vehicle’s increased height and accessibility issues.
Trucks and Vans
Heavy-duty catalytic converters are frequently needed for trucks and vans, especially for commercial or towing vehicles. Diesel trucks can cost more than $3,000, although gasoline-powered trucks typically cost between $1,200 and $3,000. Higher material content and more stringent emissions regulations for larger engines are the main causes of the cost increase.
Hybrid and Luxury Vehicles
The most expensive automobiles to replace a catalytic converter are hybrid and luxury models. These cars frequently have more valuable metals and sophisticated pollution systems.
Particularly for models like BMW, Mercedes-Benz, Lexus, and Audi, replacement expenses often vary from $2,000 to $4,000 or more. Catalytic converter theft is another common target for hybrid cars, which can raise repair costs even further.
You may set reasonable expectations and select the most economical repair choice by being aware of how vehicle type influences catalytic converter replacement costs.
Catalytic Converter Replacement Cost by Brand
The cost of replacing a catalytic converter might also differ significantly based on the make of car. While some manufacturers employ more sophisticated emissions systems that call for more costly parts, others use simpler exhaust designs. An outline of typical replacement costs for well-known car brands can be seen below.
Toyota
Toyota automobiles are renowned for their dependability and reasonably priced upkeep. Depending on the model and engine size, replacing a catalytic converter for the majority of Toyota models usually costs between $800 and $2,000. The availability of aftermarket options contributes to lower prices.
Honda
Similar to Toyota, Honda catalytic converter replacement typically costs between $700 and $1,800. SUVs like the CR-V and Pilot are more expensive than compact vehicles like the Civic and Accord.
Ford
Because of their varied inventory, Ford automobiles exhibit a larger price range. The average replacement cost is between $900 and $2,500; trucks and SUVs like the F-150 and Explorer are more expensive than sedans like the Fusion or Focus.
Chevrolet
The average cost of replacing a Chevrolet catalytic converter is between $850 and $2,400. While trucks and SUVs like the Silverado and Tahoe need more costly converters, models like the Malibu and Cruze are more reasonably priced.
Nissan
Nissan cars typically cost between $800 and $2,000. Owners have additional pricing flexibility because popular models like the Altima, Sentra, and Rogue frequently have both OEM and aftermarket alternatives.
BMW, Mercedes-Benz, and Audi
Due to stringent emissions regulations and high-end components, luxury brands have far higher replacement prices. For the majority of BMW, Mercedes-Benz, and Audi vehicles, catalytic converter replacement might cost anywhere from $2,000 to $4,000 or more.
Hyundai and Kia
When it comes to catalytic converter replacement, Hyundai and Kia automobiles are among the least expensive. The average price usually falls between $700 and $1,700, particularly if aftermarket converters are utilized.
Factors That Affect Catalytic Converter Replacement Cost
The cost of replacing your catalytic converter depends on a number of factors. You can anticipate expenses and find places where you might be able to save money by being aware of these aspects.
Vehicle Make, Model, and Engine Size
The cost of replacing your car is mostly determined by its design. Bigger engines need larger catalytic converters, which are more expensive to produce and contain more valuable metals. Compared to tiny four-cylinder cars, vehicles with V6 or V8 engines, turbocharged configurations, or dual exhaust systems sometimes have greater replacement costs.
OEM vs Aftermarket Catalytic Converter
Although they are costly, Original Equipment Manufacturer (OEM) catalytic converters are made especially for your car and adhere to stringent emissions regulations. Aftermarket catalytic converters are typically more accessible and significantly less expensive. Your decision may be impacted by the fact that some aftermarket devices might not last as long or be permitted in states or areas with stringent emissions regulations.
Location and Emissions Regulations
The cost of replacing a catalytic converter is greatly influenced by your location. CARB-compliant converters, which are more costly than federal-compliant ones, are required in states with stringent emissions regulations, including California. Additionally, labor costs differ by region, with urban areas generally charging higher rates than rural ones.
Labor Costs and Shop Rates
The difficulty of accessing the catalytic converter and whether it is bolted or welded into the exhaust system determine labor expenses. Repairs for cars that need to be chopped and welded are typically more expensive. The hourly wage for mechanics might vary from $75 to more than $150, which has a direct impact on the whole cost.
Single vs Dual Catalytic Converter Systems
Certain cars, particularly those with V-type engines and more recent emissions systems, use multiple catalytic converters. The cost may increase or even triple if several converters need to be replaced. SUVs, trucks, and luxury cars frequently have this.
Symptoms of a Bad or Failing Catalytic Converter
Check Engine Light Turns On
The check engine light is one of the first and most prevalent indicators of a malfunctioning catalytic converter. The oxygen sensors identify unusual exhaust gas levels and provide fault codes to the engine management unit when the converter is no longer effectively lowering emissions.
Efficiency below threshold alerts are a common diagnostic problem code associated with catalytic converter failure. Persistent emissions-related codes should never be disregarded, even though this signal may be a sign of other problems.
Poor Engine Performance and Loss of Power
Engine performance is directly impacted by a clogged or damaged catalytic converter that limits exhaust flow. Drivers may experience slow acceleration, diminished horsepower, hesitancy while applying the gas pedal, or trouble sustaining speed. In extreme circumstances, improper exhaust gas discharge may cause the car to stall or have difficulty starting.
Reduced Fuel Efficiency
In order to compensate for limited exhaust flow, the engine may burn more fuel when the catalytic converter malfunctions. Poor gas mileage and more frequent trips to the gas station result from this. Without altering driving habits, a sharp decline in fuel efficiency is frequently an indication of difficulties with the exhaust system, including catalytic converter problems.
Rotten Egg or Sulfur Smell from Exhaust
One of the most common signs of catalytic converter failure is a distinct rotten egg or sulfur-like smell emanating from the exhaust. Unburned gasoline and sulfur compounds that the converter is no longer able to efficiently handle are the source of this smell. It’s obvious that the internal catalyst of the converter isn’t working properly if this odor starts to appear inside or outside the car.
Rattling or Metallic Noise Under the Vehicle
The catalytic converter’s interior honeycomb structure may eventually disintegrate as a result of aging or overheating. When this occurs, especially during startup or acceleration, you could hear metallic or rattling sounds coming from below the car. This sound is a sign of physical damage that nearly always has to be replaced.
Failed Emissions Test
When a catalytic converter fails, it can no longer reduce dangerous gases to permissible levels, which frequently results in an emissions test failure. The catalytic converter is one of the first parts that should be examined if your car fails an emissions or smog test, especially if there are further symptoms.
Engine Overheating or Exhaust System Damage
In severe circumstances, the exhaust system may experience considerable heat buildup due to a severely clogged catalytic converter. This could result in melted converter housing, damaged exhaust parts, or engine overheating. In order to stop additional mechanical damage at this point, replacement must be done right away.
Can You Drive with a Bad Catalytic Converter?
Although it is not advised, driving with a malfunctioning or defective catalytic converter is possible in the short term. Even while the car could still function, driving it farther could result in greater performance difficulties, more expensive repairs, and even legal issues. The extent of the damage and the degree of exhaust flow restriction determine how long you can drive.
You could only notice small signs like a check engine light or decreased fuel efficiency in the early stages of failure. The efficiency of the catalytic converter is already reduced during this stage, even if the car may still feel manageable. Ignoring these warning indicators lets the issue worsen and frequently results in more severe exhaust obstructions and engine strain.
Engine performance can quickly decline when the catalytic converter gets increasingly clogged or damaged. Increased back pressure from restricted exhaust flow can result in overheating, misfires, and even damage to vital engine parts like oxygen sensors and valves. In severe circumstances, the car can stall or not start at all, leaving you stranded.
Legal and environmental repercussions must also be taken into account. Driving with a malfunctioning catalytic converter can lead to fines, failed emissions tests, or breaking local emissions regulations.
Long-term driving with a malfunctioning converter can also make an expensive repair into an even more expensive overhaul of the engine or exhaust system. For these reasons, the safest and most economical course of action is to identify and resolve catalytic converter problems as soon as feasible.
Is Catalytic Converter Replacement Covered by Warranty or Insurance?
Although replacing a catalytic converter might be costly, warranties or insurance may sometimes cover all or part of the expense. You can lower your out-of-pocket costs by being aware of your options.
Manufacturer Emissions Warranty
The government emissions warranty that most new cars come with usually covers the catalytic converter for eight years or 80,000 miles, whichever comes first. Because of more stringent emissions regulations, some states, like California, have longer coverage periods.
The manufacturer may pay for both parts and labor if the catalytic converter breaks because of a defect while your car is still covered by this warranty. It’s crucial to verify coverage details by consulting the dealer or the warranty documentation for your car.
Auto Insurance Coverage
If the catalytic converter is stolen or vandalized, some motor insurance policies, especially comprehensive coverage, can pay for its replacement. Mechanical breakdowns are typically not covered because this kind of coverage is not meant for wear-and-tear failures.
Comprehensive insurance can be a useful protection because thieves frequently target catalytic converters for their valuable metals. Knowing your deductible might help determine whether filing a claim is cost-effective.
You might be able to drastically lower replacement prices or even prevent paying out of pocket in some circumstances by being aware of your warranty and insurance alternatives. Prior to scheduling repairs, it is usually advised to confirm coverage.
Catalytic Converter Theft and Replacement Cost
Because catalytic converters contain valuable metals that can be sold for a profit, such as platinum, palladium, and rhodium, theft of these converters has become more frequent. Regretfully, theft not only renders your vehicle inoperable but also significantly raises the cost of replacement.
Why Catalytic Converters Are Targeted
Because these converters are simpler to access, thieves frequently target cars that are higher off the ground, such as SUVs, trucks, and vans. A catalytic converter can be removed in a matter of minutes with fast, under-the-car saws, making it a profitable crime with little danger for thieves.
Cost Impact After Theft
Since mechanics must install a new converter and fix any damage sustained during the theft, replacement costs after theft are usually more than ordinary replacement. The overall cost might vary from $1,200 to more than $4,000, depending on your car, especially if it’s a luxury or hybrid.
Signs Your Converter Was Stolen
-
Loud rattling or roaring noise from the exhaust
-
Vehicle may fail to start or run poorly
-
Visible gap in the exhaust system underneath the car
-
Check engine light may turn on
How to Prevent Catalytic Converter Theft
-
Install aprotective metal shield or cage around the converter
-
Park in well-lit, secure areas or garages
-
Consider aftermarket anti-theft devices
-
Etch your vehicle’s VIN on the converter for traceability
Catalytic Converter Replacement Labor Cost Explained
When replacing a catalytic converter, labor costs might vary based on the vehicle, the kind of converter, and the hourly rate of the mechanic. You can estimate the entire cost if you know how labor costs are determined.
Average Labor Time Required
It takes 1 to 3 hours to replace a catalytic converter on most cars. Welded converters or systems in difficult-to-reach places may take longer to replace than simple bolt-on converters. Installations that need a lot of labor might raise the overall cost by hundreds of dollars.
Bolt-On vs Welded Converters
-
Bolt-on converters: Easier and faster to replace, generally cheaper in labor costs.
-
Welded converters: Require cutting and welding the exhaust system, which increases labor time and cost. Welding also demands specialized tools and skills, making this option more expensive.
Why Some Vehicles Require More Labor
It frequently takes more effort to access the catalytic converter in cars with multiple exhaust systems, powerful engines, or densely packed undercarriages. Converters in more difficult-to-reach places may be found in trucks, SUVs, and some luxury vehicles, which would raise labor costs even more.
Depending on the intricacy of the car and local shop rates, labor charges often range from $100 to $500. You may more accurately assess repair estimates and prevent unforeseen expenses by being aware of these aspects.
How to Reduce Catalytic Converter Replacement Cost
Although replacing a catalytic converter can be costly, there are a number of ways to reduce your out-of-pocket costs without sacrificing quality or adhering to emissions regulations.
Choosing Aftermarket Converters
OEM parts are often 30–50% more expensive than aftermarket catalytic converters. However, if you live in a state like California that has stringent emissions regulations, it’s crucial to make sure the aftermarket unit is CARB-compliant.
Getting Multiple Repair Quotes
You can save hundreds of dollars by comparing at least two or three quotes because labor prices differ between shops. While still providing high-quality installation, some independent mechanics could charge less than dealership service centers.
Buying Parts Separately
Consider buying the catalytic converter yourself and having your mechanic install it if they charge a higher price for parts. This enables you to only pay labor costs while shopping for the best deal.
Checking Emissions Warranty Eligibility
The manufacturer may pay for all or part of the replacement cost if your car is covered by the federal emissions warranty. Prior to purchasing a new converter, it is worthwhile to review your warranty.
Repair vs Replacement Considerations
Sometimes a catalytic converter that is blocked or partially damaged can be cleaned or temporarily fixed. This can buy time and save immediate costs, but it’s not a long-term answer. Long-term replacement, however, is typically inevitable.
By combining these tactics, automobile owners may keep their vehicle safe and emissions-compliant while drastically lowering the overall cost of replacing the catalytic converter.
Can a Catalytic Converter Be Repaired Instead of Replaced?
Given the high expense of replacement, many automobile owners ask whether a catalytic converter can be fixed rather than replaced. Although repairs can be made in some circumstances, they are frequently just temporary and might not completely restore the converter’s efficiency.
Cleaning a Clogged Catalytic Converter
Cleaning the converter to get rid of carbon buildup or small obstructions is a popular “repair” technique. Exhaust flow can be momentarily improved using specialized catalytic converter cleaning chemicals or expert cleaning services. However, converters that are physically damaged or contaminated with coolant or oil cannot be successfully repaired using this procedure; it only works for mild clogs.
When Repair Is Possible
-
Minor carbon buildup
-
Temporary blockage affecting performance
-
No structural damage to the honeycomb catalyst
For long-term compliance with emissions regulations, repairs should not be relied upon as they are typically temporary fixes.
How Long Does a Catalytic Converter Last?
The vehicle, driving style, and maintenance procedures all affect how long a catalytic converter lasts. Catalytic converters typically have a lifespan of 70,000 to 100,000 miles, but with proper maintenance, some can survive far over 150,000 miles.
Average Lifespan in Years and Miles
-
Standard vehicles: 8–10 years or 70,000–100,000 miles
-
Luxury or high-performance vehicles: Sometimes shorter due to complex emissions systems
-
Hybrid vehicles: Often last longer due to reduced engine strain and cooler operating conditions
Driving Habits That Shorten Lifespan
-
Frequent short trips that prevent the engine from fully warming up
-
Poor maintenance, such as delayed oil changes or using the wrong fuel
-
Engine misfires or fuel system problems that can contaminate the converter
-
Aggressive driving that increases engine temperature and exhaust heat
Maintenance Tips to Extend Life
-
Regularly service your engine to prevent misfires and excess emissions
-
Use high-quality fuel to reduce contaminant buildup
-
Keep up with scheduled oxygen sensor and exhaust system checks
-
Avoid prolonged idling, which can overheat the converter
Frequently Asked Questions (FAQs)
Why Is Catalytic Converter Replacement So Expensive?
The converter’s high cost is mostly caused by precious metals that are costly to source, such as rhodium, palladium, and platinum. The total cost is also influenced by labor expenses and stringent emissions regulations.
Can I Use a Universal Catalytic Converter?
Although universal catalytic converters are available, they could not pass inspections and fulfill local emissions regulations. Safer options are OEM or CARB-compliant aftermarket converters.
Does Replacing a Catalytic Converter Improve Performance?
If the old converter was blocked or broken, a new converter can marginally increase engine efficiency and fuel economy while restoring normal exhaust flow. It is not intended to greatly increase horsepower.
How Long Does Replacement Take?
Depending on the vehicle and whether the converter is bolted or welded in place, the majority of catalytic converter replacements take one to three hours. Longer labor times may be needed for complex or dual-exhaust systems.
Can a Bad Catalytic Converter Damage My Engine?
Yes, exhaust back pressure from a severely blocked converter can cause engine overheating, misfires, and damage to oxygen sensors and other exhaust components. Costly engine repairs can be avoided with early replacement.
Conclusion
Although replacing a catalytic converter is one of the more costly maintenance procedures for car owners, it is necessary for environmental preservation, engine performance, and emissions compliance. Costs can range from $300 to over $4,000, depending on the type of vehicle, brand, labor costs, and if you use OEM or aftermarket parts.
Early warning indicators, such as check engine lights, slow acceleration, rattling sounds, or strange smells, can help stop additional engine damage and increased repair costs. Costs can also be decreased by looking into solutions like aftermarket converters, verifying warranty coverage, or getting several repair bids.
In the end, taking care of catalytic converter problems as soon as possible guarantees that your car stays safe, effective, and compliant while preventing future, more expensive repairs. The secret to reducing costs and prolonging the life of this essential component is routine maintenance and symptom awareness.
Fuel delivery, ignition timing, and overall engine safety are all significantly influenced by the cylinder head temperature sensor (CHT sensor), a tiny but crucial engine component. This sensor allows the engine to run effectively in both cold-start and high-temperature situations by continuously measuring the cylinder head’s temperature and sending real-time data to the engine management unit (ECU).
A malfunctioning cylinder head temperature sensor can result in instant drivability issues, such as hard starting, poor fuel economy, rough idling, or even engine overheating, in contrast to many engine parts that deteriorate gradually.
The accuracy of the CHT sensor is crucial for avoiding expensive engine damage because it is more significant than the coolant temperature sensor in some vehicles, particularly air-cooled and some European engines.
This blog post explains what a cylinder head temperature sensor is, how it functions, why it’s crucial, typical failure symptoms, diagnostic techniques, replacement costs, and maintenance advice.
This book will assist you in making well-informed decisions regarding your car’s engine temperature management system, whether you’re an enthusiast attempting to maintain optimal engine performance or a car owner trying to interpret a check engine light.

What Is a Cylinder Head Temperature Sensor?
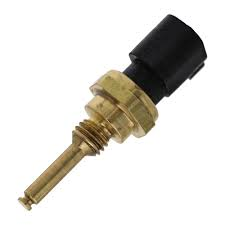
An engine-mounted temperature sensor called a cylinder head temperature sensor (CHT sensor) measures the temperature of the cylinder head metal itself, not the coolant passing through the engine.
The engine control unit (ECU) can precisely monitor engine heat levels thanks to this direct temperature monitoring, particularly in situations where coolant temperature alone does not give a full picture of engine operating temperature.
As an additional temperature sensor, the cylinder head temperature sensor is frequently utilized in air-cooled engines and some liquid-cooled automobiles.
The sensor must be designed to endure high temperatures while providing accurate data to the ECU since the cylinder head is subjected to intense heat during combustion. Since the majority of CHT sensors are thermistors, their electrical resistance varies with temperature.
Definition and Basic Function
The cylinder head temperature sensor’s main job is to let the ECU know how hot the cylinder head is at any given time. The ECU uses this data to modify a number of crucial engine parameters, such as:
-
Fuel injection timing and fuel mixture
-
Ignition timing
-
Idle speed during cold starts
-
Engine cooling fan operation (in some vehicles)
-
Emissions control strategies
The ECU may increase the fuel mixture to enhance warm-up and starting while the engine is cold. To avoid knocking, overheating, or engine damage, the ECU gradually leans the mixture and improves ignition timing as the cylinder head temperature increases.
Where the Cylinder Head Temperature Sensor Is Located
To precisely monitor metal temperature, the cylinder head temperature sensor is usually screwed directly into the cylinder head. Typical places to mount include:
-
Near the combustion chamber
-
Between cylinders
-
Close to the exhaust valve area
The sensor can malfunction over time because of its placement, which exposes it to extreme heat and vibration. In certain engines, the sensor is readily accessible from the top of the engine bay, but in others, it could be necessary to remove intake parts or engine covers.
How a Cylinder Head Temperature Sensor Works
Engine heat is transformed by the cylinder head temperature sensor into an electrical signal that the engine control unit (ECU) can decipher. The ECU heavily depends on this sensor’s input to perform real-time changes that keep the engine operating smoothly under all driving situations because temperature directly influences combustion efficiency and engine safety.
The ECU can react fast to cold starts, severe engine loads, or overheated circumstances since the majority of cylinder head temperature sensors are made to react swiftly to temperature changes. In engines that do not rely entirely on coolant temperature for thermal control, this quick reaction time is particularly crucial.
Sensor Design and Temperature Measurement
A cylinder head temperature sensor typically uses a Negative Temperature Coefficient (NTC) thermistor. This means:
-
High resistance at low temperatures
-
Low resistance at high temperatures
The internal resistance of the sensor decreases when the cylinder head heats up. Accurate measurement of cylinder head heat rather than fluid temperature is made possible by this change in resistance, which is proportionate to the temperature of the metal around the sensor.
To guarantee direct contact with engine metal, the sensor is threaded into the cylinder head and encased in a heat-resistant shell. It can measure actual combustion-related heat rather than averaged or delayed temperatures thanks to this architecture.
How Data Is Sent to the ECU
Based on its resistance, the cylinder head temperature sensor transmits a voltage signal to the ECU. This signal is continuously monitored by the ECU, which then compares it to temperature maps that have been preprogrammed. The ECU may, based on the readings:
-
Increase fuel delivery during cold starts
-
Reduce ignition timing to prevent engine knock
-
Activate engine cooling strategies
-
Trigger warning lights or fail-safe modes
The ECU may store a diagnostic fault code and turn on the check engine light if the signal is outside of the anticipated range.
Cylinder Head Temperature Sensor vs Engine Coolant Temperature Sensor
While both sensors are in charge of keeping an eye on engine temperature, the cylinder head temperature sensor (CHT) and the engine coolant temperature sensor (ECT) have different functions and give the engine control unit (ECU) different kinds of information. Accurate diagnosis, appropriate maintenance, and general engine dependability all depend on an understanding of their differences.
What the Cylinder Head Temperature Sensor Measures
The actual temperature of the cylinder head metal is measured by the cylinder head temperature sensor. It responds fast to heat produced during combustion since it is installed directly into the cylinder head. This enables the ECU to identify abrupt temperature spikes that might happen during lean air-fuel circumstances, high engine loads, or harsh acceleration. In engines where quick and accurate temperature feedback is needed to avoid overheating or detonation, the CHT sensor is particularly useful.
What the Engine Coolant Temperature Sensor Measures
The temperature of the engine coolant as it moves through the cooling system is measured by the engine coolant temperature sensor. In order to control cooling fans, warm-up enrichment, and emissions systems, this sensor offers a more consistent and averaged view of engine temperature. However, compared to a cylinder head temperature sensor, the ECT sensor reacts more slowly to abrupt temperature fluctuations since coolant absorbs heat gradually.
Response Time and Temperature Accuracy
Response time is one of the main distinctions between the two sensors. The cylinder head temperature sensor is quite accurate at identifying localized overheating since it responds to changes in combustion heat nearly instantaneously. On the other hand, because the coolant must first absorb heat and move through the engine, the coolant temperature sensor responds more slowly. This distinction explains why some engines use ECT sensors for long-term temperature control while relying on CHT sensors for immediate engine protection.
Effect on Fuel Injection and Ignition Timing
Though in distinct ways, both sensors have an impact on ignition timing and fuel injection. The ECU can adjust the air-fuel mixture and ignition timing depending on real-time combustion heat thanks to the cylinder head temperature sensor, especially during cold starts and high-load situations.
On the other hand, once normal operating temperature is reached, the coolant temperature sensor makes sure the engine runs smoothly and helps control fuel enrichment during warm-up. Poor fuel economy, harsh running, or trouble starting can result from a faulty reading from either sensor.
Engine Designs That Use Each Sensor
Because they don’t have a liquid cooling system, air-cooled engines mostly rely on cylinder head temperature sensors. While certain high-performance and European cars have both sensors, many liquid-cooled engines use coolant temperature sensors as the main temperature input. In certain situations, the ECU integrates information from the CHT and ECT sensors to improve overheating protection, fuel efficiency, and engine control.
Which Sensor Is More Critical?
Engine design determines the relative relevance of each sensor. However, when a cylinder head temperature sensor fails, the ECU lacks precise information regarding combustion heat, which might result in rapid drivability issues. Because of this, knowing each sensor’s function ensures a speedier diagnosis and avoids needless engine damage.
Why the Cylinder Head Temperature Sensor Is Important
Maintaining engine performance, efficiency, and long-term dependability depends heavily on the cylinder head temperature sensor. It gives the engine control unit (ECU) the precise information required to safeguard the engine in both typical and harsh running circumstances since it measures the real temperature of the cylinder head.
Role in Engine Fuel Management
Helping the ECU regulate the air-fuel mixture is one of the cylinder head temperature sensor’s main purposes. The sensor alerts the ECU to enrich the fuel mixture for a smoother warm-up and easier starting when the engine is cold. The ECU gradually leans the mixture to increase fuel efficiency and lower emissions as the cylinder head temperature rises. The engine may run excessively rich or too lean in the absence of precise temperature data, which would result in subpar performance and higher fuel usage.
Influence on Ignition Timing
Ignition timing is also influenced by the cylinder head temperature sensor. Engine knock or detonation may be more likely when cylinder head temperatures are high. When the sensor senses excessive heat, the ECU may delay ignition timing to avoid this. On the other hand, ideal ignition timing is maintained for maximum power and efficiency at typical operating temperatures. This equilibrium may be upset by a malfunctioning sensor, resulting in misfires, knocking, or decreased engine performance.
Preventing Engine Overheating
The sensor serves as an early warning system for overheating since it responds swiftly to sudden temperature fluctuations. This is particularly crucial in high-load driving scenarios including forceful acceleration, steep hill climbing, and towing. In order to prevent serious engine damage, the ECU can initiate precautionary measures like lowering engine power or turning on warning lights if excessive temperatures are detected.
Improving Emissions Control
Exhaust emissions are directly impacted by the ECU’s ability to maintain optimal combustion, which is made possible by accurate cylinder head temperature data. Emissions-control devices like the catalytic converter function more effectively when the engine is running at the proper temperature. Improper fuel supply due to a defective cylinder head temperature sensor might result in increased emissions and possibly fail an emissions test.
Supporting Overall Engine Longevity
The cylinder head temperature sensor greatly extends engine life by controlling fuel mixture, ignition timing, and thermal management. Regularly accurate temperature readings guarantee that the engine runs within safe bounds for the duration of its life, lessen the strain on internal parts, and avoid damage from overheating.
Common Symptoms of a Bad Cylinder Head Temperature Sensor
The engine control unit (ECU) may receive inaccurate or inconsistent temperature data when the cylinder head temperature sensor starts to malfunction. Even a tiny mistake can result in discernible drivability problems because the ECU mostly depends on this data to control fuel delivery and ignition timing. Early detection of these symptoms can help avoid expensive repairs and engine damage.
Check Engine Light Illumination
The check engine light is one of the first and most prevalent indicators of a malfunctioning cylinder head temperature sensor. The ECU registers a diagnostic fault code and activates the warning light when it finds temperature measurements that deviate from the anticipated range or do not match data from other sensors. If you ignore this warning, underlying issues may eventually get worse.
Hard Starting or No-Start Condition
Hard starting, particularly when the engine is cold, might be caused by a malfunctioning cylinder head temperature sensor. The ECU may cut fuel flow if the sensor indicates high temperatures incorrectly, which would make it harder for the engine to start. In extreme circumstances, an excessively lean air-fuel ratio may prevent the engine from starting at all.
Poor Fuel Economy
The engine may run excessively rich or too low due to inaccurate temperature readings, both of which have a detrimental effect on fuel efficiency. Higher fuel consumption and a discernible decrease in miles per gallon can result from an excessive fuel injection caused by a sensor that is stuck at a low temperature reading.
Engine Overheating or Running Too Cool
The ECU may not initiate precautionary measures if the sensor is unable to identify growing cylinder head temperatures, which raises the possibility of engine overheating. On the other hand, if a sensor is trapped at a high temperature, the engine may act as though it is overheated even when it is not, which would lead to subpar performance and needless power decrease.
Rough Idle and Engine Misfires
Inaccurate temperature data can cause hesitation, rough idling, or engine misfires by interfering with fuel injection and ignition timing. During cold starts or stop-and-go driving, when exact temperature regulation is crucial, these symptoms are frequently more apparent.
Reduced Engine Power or Limp Mode
In certain cars, the ECU may go to limp mode as a precaution if the cylinder head temperature sensor fails. In order to prevent internal components from overheating or being damaged, this lowers engine power, which causes the car to feel slow or unresponsive.
What Causes Cylinder Head Temperature Sensor Failure
Although cylinder head temperature sensors are designed to survive high temperatures and challenging engine conditions, a variety of mechanical, electrical, and environmental problems can eventually cause them to malfunction. You can maintain your engine operating dependably and avoid premature failure by being aware of these causes.
Heat Exposure and Thermal Stress
The sensor is subjected to intense heat from combustion since it is installed directly in the cylinder head. Thermal fatigue can result from the sensor material’s constant expansion and contraction brought on by high temperatures, which over time might reduce the sensor’s accuracy or cause it to stop working completely.
Electrical Issues and Wiring Damage
In order to transmit values to the ECU, the cylinder head temperature sensor needs a steady electrical connection. The engine control unit may not receive precise signals due to rusted connectors, damaged wiring, or short circuits. Intermittent or total sensor failure can result from the deterioration of wires and connectors caused by heat, vibration, and exposure to engine fluids over time.
Corrosion and Contamination
The sensor or its contacts may deteriorate if exposed to oil, coolant, dirt, or other engine impurities. Inaccurate temperature readings can result from electrical conductivity being disrupted by even a tiny amount of dirt or corrosion. This kind of damage can occasionally be accelerated by coolant leaks or oil seepage close to the sensor.
Age and Mileage Factors
Cylinder head temperature sensors deteriorate with time, just like any other automobile part. Although most sensors are meant to last between 80,000 and 120,000 miles, their lifespan may be shortened by severe engine use, extremely high or low temperatures, or inadequate maintenance. Before total failure, age-related degeneration frequently shows itself as inconsistent temperature readings or delayed response times.
Engine Modifications and Aftermarket Changes
Heat and stress levels may rise in engines that have been adjusted or altered for improved performance. Turbochargers and performance exhaust systems are examples of aftermarket components that can boost cylinder head temperatures above the original design limitations, hastening sensor degradation or leading to early failure.
Cylinder Head Temperature Sensor Trouble Codes (OBD-II)
On-Board Diagnostics (OBD-II) systems, which track sensor health and engine performance, are standard on contemporary cars. The ECU stores diagnostic trouble codes (DTCs) and may turn on the check engine light when a cylinder head temperature sensor fails. Accurate troubleshooting and prompt fixes depend on an understanding of these codes.
Common Diagnostic Codes
Some of the most frequent OBD-II codes related to cylinder head temperature sensors include:
-
P1285 – Cylinder Head Temperature Sensor Circuit Malfunction
-
P0117 – Engine Coolant Temperature Circuit Low Input (may affect CHT sensor in some models)
-
P0118 – Engine Coolant Temperature Circuit High Input
-
P0125 – Insufficient Coolant Temperature for Closed Loop Fuel Control (can be linked to CHT sensor issues)
These codes indicate problems ranging from sensor failure to wiring or connector issues. Each code helps pinpoint whether the problem is with the sensor itself, the circuit, or the ECU reading.
What Each Code Means
-
P1285: Indicates the cylinder head temperature sensor signal is outside the expected range. Often caused by sensor failure, wiring damage, or poor connector contact.
-
P0117 / P0118: Signals abnormal voltage from a temperature sensor, suggesting low or high temperature readings. May indicate short circuits, open circuits, or sensor degradation.
-
P0125: Triggered when the ECU believes the engine is not reaching optimal operating temperature. While this code usually relates to the coolant sensor, a faulty CHT sensor can contribute in engines that use both sensors.
Can You Drive With These Codes?
It is generally not advised to drive when the cylinder head temperature sensor is malfunctioning. The engine may continue to run, but the ECU loses important information for:
-
Fuel mixture adjustment
-
Ignition timing
-
Overheating protection
Poor performance, higher fuel consumption, and possible engine damage might result from this. The ECU may occasionally go into limp mode, which lowers engine output to avoid overheating. Early detection and resolution of these codes helps prevent later, more costly repairs.
How to Test a Cylinder Head Temperature Sensor
The engine control unit (ECU) receives precise temperature measurements from a cylinder head temperature (CHT) sensor when it is tested. Poor fuel economy, misfires, hard starts, and even engine overheating can be caused by a malfunctioning sensor. It is possible to ascertain whether the sensor needs to be cleaned, repaired, or replaced by conducting an appropriate test.
Tools Required
To test a cylinder head temperature sensor, you will need the following tools:
-
Digital multimeter – to measure resistance or voltage
-
OBD-II scanner – to read live temperature data from the ECU
-
Service manual – for manufacturer-specific resistance or voltage specifications
-
Gloves and basic hand tools – for safely accessing the sensor
Having the right tools ensures accurate testing and prevents damage to the sensor or wiring.
Step-by-Step Testing Procedure
-
Locate the Sensor: Refer to the vehicle’s service manual to find the cylinder head temperature sensor. It is usually threaded into the cylinder head or near the exhaust valve area.
-
Disconnect the Sensor: Carefully unplug the sensor from its electrical connector.
-
Measure Resistance: Set your multimeter to measure ohms and test the sensor across its terminals. Compare the reading to the manufacturer’s temperature-resistance chart.
-
Check Voltage Output: If your sensor operates with a voltage signal, reconnect it and measure the voltage while the engine warms up. The voltage should change gradually as the temperature increases.
-
Compare with Expected Values: Any readings significantly outside the manufacturer’s specified range indicate a faulty sensor.
Normal vs Abnormal Readings
-
Normal Readings: Resistance decreases as the temperature rises (for NTC thermistor sensors). Voltage gradually increases or decreases according to design specifications.
-
Abnormal Readings: A malfunctioning sensor is indicated by results that are significantly outside of the recommended range, unpredictable fluctuations, or no change in resistance or voltage with temperature changes.
Can You Drive With a Bad Cylinder Head Temperature Sensor?
In general, it is not advised to drive with a malfunctioning cylinder head temperature (CHT) sensor. A broken sensor can affect engine performance, fuel economy, and long-term dependability, even if some cars might still be able to operate. You can decide whether to keep driving or deal with the problem right away if you are aware of the risks.
Cylinder Head Temperature Sensor Replacement Cost
The cost of parts and labor for replacing a cylinder head temperature (CHT) sensor might vary based on the make, model, and engine architecture of the vehicle. Car owners can budget for repairs and choose between DIY and professional installation by being aware of the cost breakdown.
Average Replacement Cost in the U.S.
A cylinder head temperature sensor typically costs between $80 and $250 to replace. This covers labor costs as well as the sensor’s cost. The large range is caused by things like engine configuration, sensor accessibility, and whether the automobile is a high-performance model or a regular passenger car.
The sensor itself is reasonably priced in many cars; an OEM or premium aftermarket sensor typically costs between $20 and $80. However, depending on how simple it is to access the sensor, labor charges can range from $60 to $150.
Labor Cost Breakdown
Labor costs can be influenced by several factors:
-
Sensor accessibility: On some engines, the CHT sensor is located under intake components, requiring additional removal steps.
-
Engine type: Inline engines often provide easier access, while V-type engines or turbocharged engines may require more labor.
-
Mechanic rates: Labor rates vary by region and shop; dealerships typically charge more than independent repair shops.
Because labor can sometimes exceed the cost of the sensor itself, it’s important to get an estimate before authorizing repairs.
How Long Does a Cylinder Head Temperature Sensor Last?
The type of vehicle, engine conditions, and maintenance procedures all affect how long a cylinder head temperature (CHT) sensor lasts. These sensors do not survive forever, even though they are made to endure high temperatures and challenging engine settings. Car owners can anticipate replacement and prevent unexpected engine problems by being aware of their estimated lifespan.
Average Lifespan
Under typical driving circumstances, the majority of cylinder head temperature sensors last between 80,000 and 120,000 miles. Practically speaking, this means that an average car will last 8 to 12 years, depending on engine usage and climatic conditions. While less expensive aftermarket sensors might break down sooner, some premium OEM sensors might survive even longer.
Factors That Reduce Sensor Life
Several factors can shorten the lifespan of a cylinder head temperature sensor:
-
Extreme heat cycles: Frequent high-temperature operation or performance driving increases thermal stress.
-
Contamination: Oil, coolant leaks, dirt, and debris can corrode the sensor or damage electrical contacts.
-
Vibration: Constant engine vibrations can loosen connectors or damage the sensor housing.
-
Electrical issues: Wiring faults, shorts, or poor grounding can cause intermittent failures.
-
Engine modifications: Turbocharging, tuning, or aftermarket exhaust systems can raise cylinder head temperatures beyond original design limits.
Being aware of these risk factors allows owners to monitor the sensor and address minor issues before a complete failure occurs.
Preventive Maintenance Tips
To maximize the life of a cylinder head temperature sensor, consider the following maintenance practices:
-
Regular inspection: Check the sensor and its wiring during routine engine maintenance. Look for corrosion, loose connectors, or physical damage.
-
Keep the engine clean: Prevent oil, coolant, or dirt buildup around the sensor.
-
Address leaks promptly: Coolant or oil leaks near the sensor can accelerate wear and cause inaccurate readings.
-
Avoid extreme engine abuse: Excessive high-RPM driving or overheating situations can degrade the sensor faster.
You may assist guarantee accurate temperature readings and extend the sensor’s useful life by following these easy preventive measures.
Best Cylinder Head Temperature Sensor Brands
Selecting a reputable manufacturer is essential when replacing a cylinder head temperature (CHT) sensor in order to guarantee precise temperature readings, engine efficiency, and long-term durability. Although there are premium aftermarket and OEM (Original Equipment Manufacturer) brands, not all sensors function the same.
OEM Recommendations
OEM sensors are made to precisely match the make and model of the car. Typically, they provide:
-
Precise calibration for accurate readings
-
High reliability and longer lifespan
-
Warranty coverage when purchased through dealerships or authorized suppliers
Common OEM brands include:
-
Bosch – Widely used in European and Japanese vehicles, known for durability and accuracy
-
Denso – Common in Japanese cars, praised for fast response and consistent readings
-
Delphi – Used in many American vehicles, reliable under high-heat conditions
Although OEM sensors are usually more costly than aftermarket alternatives, their lifespan and performance can make the price worthwhile.
Trusted Aftermarket Brands
High-quality CHT sensors that work with many car manufacturers are available from a number of aftermarket brands:
-
Standard Motor Products (SMP) – Offers sensors with specifications similar to OEM units
-
ACDelco – Reliable for GM and other American vehicles, widely available
-
NGK/NTK – Known for high-temperature tolerance and fast response
-
Vemo and Wahler – Trusted for European vehicles
To prevent performance or lifetime problems, be sure the aftermarket sensor you select is made for your particular car and meets or surpasses OEM requirements.
Cylinder Head Temperature Sensor Maintenance
For precise engine temperature monitoring, effective operation, and long-term engine health, maintaining your cylinder head temperature (CHT) sensor is essential. Because the sensor works in a demanding environment with high temperatures, vibrations, and possible contamination, routine maintenance helps avoid early failure and expensive repairs.
Keep the Sensor and Wiring Clean
Reliable operation requires a clean sensor. The sensor’s readings may be affected by dirt, oil, or coolant leaks, which could result in erroneous data being transmitted to the ECU. When doing regular engine inspections:
-
Clean the sensor housing to remove any accumulated dirt or debris.
-
Inspect the electrical connector for corrosion or moisture that could disrupt the signal.
-
Check the wiring harness for frayed or damaged insulation, ensuring all connections are secure.
Accurate, reliable temperature readings from the sensor are ensured by maintaining cleanliness and tight connections.
Protect the Engine from Overheating
Controlling heat exposure is essential since the CHT sensor keeps an eye on cylinder head temperature to guard against engine damage:
-
Maintain the cooling system, including radiator, hoses, and coolant levels, to avoid excessive engine temperatures.
-
Avoid prolonged high-RPM or heavy-load driving without adequate cooling.
-
Address engine overheating immediately, as repeated exposure to extreme temperatures can degrade the sensor’s internal components.
In addition to protecting the sensor, limiting overheating also protects the engine from potential harm like blown gaskets or distorted heads.
Inspect the Sensor During Routine Engine Service
Examining the CHT sensor is a good idea if you undertake engine maintenance or remove parts close to the cylinder head:
-
Check for physical damage or corrosion that may affect performance.
-
Ensure wiring connections are tight and intact to prevent intermittent failures.
-
Clean the mounting area to avoid contamination that could affect readings.
Regular inspection can identify little problems before they become serious sensor failures, saving time and money on repairs.
Replace the Sensor at the First Sign of Trouble
CHT sensors have a limited lifespan and may eventually need to be replaced, even with proper maintenance. If you observe the following, think about changing the sensor:
-
Erratic or inconsistent temperature readings from the sensor.
-
Persistent check engine light with codes related to cylinder head temperature.
-
Engine performance issues, such as rough idling, misfires, overheating, or poor fuel economy.
In addition to protecting the engine and ensuring optimal performance, proactive replacement helps maintain precise temperature monitoring.
Frequently Asked Questions (FAQs) About Cylinder Head Temperature Sensors
Although cylinder head temperature (CHT) sensors are essential parts, many car owners frequently have concerns about their operation, symptoms, and replacement. You can maintain your engine, identify issues, and make wise repair decisions by being aware of these FAQs.
Is a Cylinder Head Temperature Sensor the Same as a Coolant Temperature Sensor?
No. Both sensors track distinct areas even though they both detect engine temperature. The CHT sensor provides quick feedback on combustion heat by measuring the cylinder head metal’s real temperature. A slower, averaged view of engine temperature is provided by the engine coolant temperature (ECT) sensor, which detects the temperature of the circulating coolant. For the best engine management, some cars make use of both sensors.
Can a Bad Cylinder Head Temperature Sensor Cause Overheating?
Yes! Inaccurate temperature readings from a malfunctioning sensor could prohibit the ECU from activating the cooling fan or making the necessary fuel adjustments. If this is not fixed, the engine may overheat, perform poorly, or possibly sustain damage.
How Many Cylinder Head Temperature Sensors Does a Car Have?
Each cylinder bank in the majority of cars equipped with CHT sensors has one. V-type engines may feature two sensors, one for each bank, but inline engines usually have just one. Additional sensors for improved temperature monitoring may also be included in some European or high-performance cars.
Can I Replace the Sensor Myself?
Yes, replacing an engine is frequently simple, however accessibility varies depending on the type of engine. For seasoned auto owners with the right tools, a service manual, and a basic understanding of mechanics, DIY replacement is doable. To guarantee proper torque and calibration, complicated engines or difficult-to-reach sensors might need to be installed by professionals.
Will a Bad Sensor Damage My Engine?
Ignoring a malfunctioning CHT sensor might result in the wrong fuel mixture, inaccurate ignition timing, and overheating, which can harm the cylinder head, pistons, or valves. Optimal performance is maintained and serious engine issues are avoided with prompt diagnosis and replacement.
How Can I Test My Cylinder Head Temperature Sensor?
You can test the sensor using:
-
An OBD-II scanner to read live temperature data and check for trouble codes.
-
A multimeter to measure resistance and compare it to manufacturer specifications.
-
Visual inspection for corrosion, damaged wiring, or physical sensor damage.
Accurate testing helps determine if the sensor is faulty or if wiring or ECU issues are causing problems.
Conclusion
A tiny but essential part that has a significant impact on engine performance, fuel economy, and long-term dependability is the cylinder head temperature (CHT) sensor. It protects the engine from overheating and damage by enabling the ECU to modify fuel delivery, ignition timing, and cooling techniques based on real-time temperature data from the cylinder head.
Maintaining smooth operation and avoiding expensive engine repairs can be achieved by identifying the signs of a failing sensor, carrying out the appropriate diagnostics, and replacing it as needed. The sensor’s lifespan can be increased and accurate readings can be guaranteed with routine examination, clean connections, and attention to engine temperature management.
In the end, keeping a healthy cylinder head temperature sensor is crucial to maximizing engine performance, safeguarding important parts, and attaining fuel efficiency, making it a crucial component of regular automotive maintenance.
-

 Car Problems5 months ago
Crankshaft Pulley: Symptoms of Failure, Replacement Cost & Function
-

 DIY Fixes5 months ago
Engine Mount Replacement Cost
-

 Car Problems5 months ago
Cylinder Head Temperature Sensor: Function, Symptoms & Replacement Cost
-

 Car Problems5 months ago
How Much Is a Turbo Charger?
-

 Car Problems5 months ago
Variable Valve Timing Solenoid – Symptoms, Location, Function & Replacement Cost
-

 Check Engine Light5 months ago
Camshaft Position Sensor Replacement
-

 Costs5 months ago
Catalytic Converter Replacement Cost
-

 Car Problems5 months ago
Best Catalytic Converter Cleaner